


Table of contents
A word about this list...
While the AWS Console is where most users would go to manage their AWS resources, some AWS management tasks are quicker and easier to do using the AWS CLI. This is especially so when you need to do things programmatically, such as doing repeated or bulk actions. With this in mind, I decided to come up with a list of my top 10 AWS CLI commands.
First and foremost, I'd like to say that this list is very subjective to my own AWS usage and preferences. Everyone uses AWS differently and with so many AWS services available, each person would have their own set of most useful AWS CLI commands.
I have put together this top 10 list based on a mixture of usefulness, frequency of use and ease of use. The rankings have been done by feeling rather than using any scientific method. My hope for readers is that by going through this list, they may find a new AWS CLI command that they find useful.
The AWS CLI version I have used for this top 10 list is 2.11.16.
Top 10 AWS CLI commands list
10 - aws ssm get-parameters-by-path
This command allows you to retrieve SSM parameters by paths. Even if you do not use SSM Parameters, it may be useful to know that AWS provides public parameters that can be used to retrieve the latest AMI IDs.
For example, you can retrieve the latest AMI IDs for Amazon Linux and Amazon Linux 2 with the following command:
$ aws ssm get-parameters-by-path --path /aws/service/ami-amazon-linux-latest --query 'Parameters[].[Name,Value]'
This would return the following:
[
   [
        "/aws/service/ami-amazon-linux-latest/amzn-ami-hvm-x86_64-gp2",
        "ami-0a0b3d75f9ce76e71"
    ],
    [
        "/aws/service/ami-amazon-linux-latest/amzn-ami-hvm-x86_64-s3",
        "ami-0c24952b67b5890ac"
    ],
    [
        "/aws/service/ami-amazon-linux-latest/amzn2-ami-hvm-x86_64-ebs",
        "ami-0c4b0fa2b03702bd9"
    ],
    ...
]
There are several AWS services with public parameters that you can find documented here: https://docs.aws.amazon.com/systems-manager/latest/userguide/parameter-store-finding-public-parameters.html
9 - aws cloudformation deploy
This command deploys a CloudFormation template. CloudFormation allows you to define the AWS resources you want to create and configure in a YAML or JSON file. You can think of the CloudFormation template as a recipe for deploying your AWS resources.
This command is in my top 10 list because of the appreciation that it is possible to deploy and configure all the AWS resources for a working environment with this single command.
aws cloudformation deploy \
  --template-file ${TEMPLATE_FILE} \
  --stack-name ${STACK_NAME} \
  --parameter-overrides file://${PARAMETERS_FILE}
One of the best things about CloudFormation templates is that they can be reused and shared. It can save a lot of time if you already have a template to deploy the resources you need. Over time, you may find yourself with a collection of go-to CloudFormation templates of common cloud resource configurations that you deploy using this CLI command.
8 - <command> --generate-cli-skeleton
This is not quite a command, but rather a common option argument available to many AWS commands. When this option is given for a command, it outputs JSON or YAML that can be used as a skeleton or template for the input of the command.
For example, to generate the input skeleton for creating a new security group in YAML:
aws ec2 create-security-group --generate-cli-skeleton yaml-input
This returns:
Description: ''  # [REQUIRED] A description for the security group.
GroupName: '' # [REQUIRED] The name of the security group.
VpcId: '' # [EC2-VPC] The ID of the VPC.
TagSpecifications: # The tags to assign to the security group.
- ResourceType: capacity-reservation  # The type of resource to tag on creation. Valid values are ...
  Tags: # The tags to apply to the resource.
  - Key: ''  # The key of the tag.
    Value: '' # The value of the tag.
DryRun: true # Checks whether you have the required permissions for the action ...
You can save this skeleton to a file and then set the input values before passing the file to the command as an input argument. This is especially useful for commands that have many input options.
The typical usage pattern of this command option would be as follows.
Generate the skeleton/template file:
aws ec2 create-security-group --generate-cli-skeleton yaml-input > inputs.yaml
Set the desired input values in inputs.yaml then run the command passing the input.yaml file:
aws ec2 create-security-group --cli-input-yaml file://inputs.yaml
JSON option is also available and is the default output:
aws ec2 create-security-group --generate-cli-skeleton > inputs.json
aws ec2 create-security-group --cli-input-json file://inputs.json
7 - <command> --output json | yaml
Another command option argument that I have added to this list. This is a global option argument that makes executed commands output in JSON or YAML format.
This may be a bit of a moot item on the list because by default the AWS CLI already outputs in JSON. Still, we can take the time to appreciate that this command option is available to us and highlight the advantages of outputting in JSON or YAML.
The first advantage is that AWS command outputs are easier to read in JSON or YAML format compared to text.
Consider the following example command that outputs in YAML format:
aws ec2 describe-images --image-ids ami-0a0b3d75f9ce76e71 --output yaml
The YAML formatted output (with parts omitted):
Images:
- Architecture: x86_64
  CreationDate: '2023-04-20T21:54:15.000Z'
  Description: Amazon Linux AMI 2018.03.0.20230419.0 x86_64 HVM gp2
  ImageId: ami-0a0b3d75f9ce76e71
  ImageLocation: amazon/amzn-ami-hvm-2018.03.0.20230419.0-x86_64-gp2
  ImageOwnerAlias: amazon
  Name: amzn-ami-hvm-2018.03.0.20230419.0-x86_64-gp2
  PlatformDetails: Linux/UNIX
  Public: true
  RootDeviceName: /dev/xvda
  RootDeviceType: ebs
  VirtualizationType: hvm
Compare this to the same command but in text output:
aws ec2 describe-images --image-ids ami-0a0b3d75f9ce76e71 --output text
The text output:
IMAGES  x86_64  2023-04-20T21:54:16.000Z        2025-04-20T21:54:16.000Z        Amazon Linux AMI 2018.03.0.20230419.0 x86_64 HVM gp2    True    xen     ami-0a0b3d75f9ce76e71   amazon/amzn-ami-hvm-2018.03.0.20230419.0-x86_64-gp2     amazon     machine amzn-ami-hvm-2018.03.0.20230419.0-x86_64-gp2    137112412989    Linux/UNIX      True    /dev/xvda       ebs     simple  available       RunInstances    hvm
BLOCKDEVICEMAPPINGS     /dev/xvda
EBS     True    False   snap-0f1a7482cc9b70c86  8       gp2
The second advantage of using a formatted output such as JSON is that it is easier to process by downstream applications that need to use the output of your command. For example, if you need to use AWS CLI commands in a script, jq can be used to parse the JSON outputs of AWS CLI commands:
current_account=$(aws sts get-caller-identity --output json | jq -r '.Account')
6 - aws history list
As you may have guessed from its name alone, this command gives a history list of the AWS commands you have run.
$ aws history list

9f86d032-2535-4eec-aff1-955c1bcc5628  2023-05-02 04:45:37 PM  sso login                                         0
05f849bd-dc7c-4a5d-90ce-080b88cc71e4  2023-05-02 04:45:11 PM  sts get-caller-identity                           255
b2bd9f55-e4e2-41f9-ac0c-ebc77d6be05f  2023-05-02 05:01:48 PM  ec2 create-security-group                         0
The history list shows each AWS CLI command you run with a timestamp and a unique command ID. The command ID can then be used to show the commands arguments and the AWS API requests and responses that serviced the command:
$ aws history show b2bd9f55-e4e2-41f9-ac0c-ebc77d6be05fq

AWS CLI command entered
at time: 2023-05-02 17:01:48.393
with AWS CLI version: aws-cli/2.11.16 Python/3.11.3 Darwin/22.4.0 exe/x86_64 prompt/off
with arguments: ['ec2', 'create-security-group', '--cli-input-json', 'file://input.json']

...

[1] HTTP request sent
at time: 2023-05-02 17:01:48.980
to URL: https://ec2.ap-southeast-2.amazonaws.com/
with method: POST
with headers: {...}
with body: Action=CreateSecurityGroup&Version=2016-11-15&GroupDescription=A+security+group&GroupName=freddy-cli-created-sg&VpcId=vpc-111222333444555b

[1] HTTP response received
at time: 2023-05-02 17:01:49.482
with status code: 200
...
The command history can show you useful information to track down what changes have been made to your AWS account.
To use AWS CLI history you need to enable it first with:
aws configure set cli_history enabled
5 - aws s3 ls
S3 is one of AWS's most popular services. As such, I think a large number of AWS users would find the AWS CLI commands for interacting with S3 useful. This command can list all your S3 buckets:
$ aws s3 ls

2023-04-05 09:15:00 example-bucket
2022-11-29 13:30:32 demo-bucket
2021-07-27 10:23:48 sample-bucket
It can also list objects in an S3 bucket:
$ aws s3 ls s3://example-bucket

                           PRE folder/
2021-09-25 10:27:40     810058 file1.txt
2021-09-25 10:21:06     276275 file2.txt


$ aws s3 ls s3://example-bucket --recursive

2021-09-25 10:27:40     810058 file1.txt
2021-09-25 10:21:06     276275 file2.txt
2023-03-29 19:08:34        330 folder/file3.txt
For people who are just getting started with AWS, I would recommend they have a look at using the S3 service and use the AWS CLI commands to interact with it. This command for S3 is easy to understand and remember. It also helps that this command and the next one in this list are so similar to Linux/Unix ls and cp commands.
The aws s3 ls command was one of the first AWS CLI commands I learnt to use. In my work using AWS, S3 tends to be a common AWS service I regularly come across, thus I find myself still using this command.
4 - aws s3 cp
One rank better than aws s3 ls is aws s3 cp. This command copies files to and from your local file system and S3 buckets:
Example - to copy a file object from S3 to a local directory:
aws s3 cp s3://this-bucket/file1.txt ./local/
Example - to copy a file object from a local directory to S3:
aws s3 cp file2.txt s3://this-bucket/file2.txt
Example - to copy a file object between two S3 buckets:
aws s3 cp s3://this-bucket/file1.txt s3://that-bucket/file1.txt
Like the one before it, this AWS command for S3 is simple and easy to remember.
Once you get the hang of this command, you will find it faster for copying files to or from S3 than using the AWS Console.
3 - aws configure list-profiles
This command lists the profile names available in your AWS configuration and credentials file. This is useful if you have configured a lot of profiles for accessing a multitude of AWS accounts, regions, roles and authentication methods (and in various combinations).
$ aws configure list-profiles

account-foo-admin-ap-southeast-2
account-foo-readonly-ap-southeast-2
account-bar-admin-us-east-1
account-bar-admin-sso-us-east-1
If you deal with many AWS accounts like me, you've built up a growing number of profiles without any naming convention or ordering and have forgotten their exact names. If you need to locate a profile quickly and remember a keyword in the name, you can use this command in combination with grep. For example:
$ aws configure list-profiles | grep foo

account-foo-admin-ap-southeast-2
account-foo-readonly-ap-southeast-2
2 - aws sso login
This command allows you to sign in directly to the AWS CLI using the same credentials that you have used to log in to AWS IAM Identity Center (formerly AWS SSO).
IAM Identity Center can provide federated access to all your AWS accounts by allowing you to perform single sign-on using IAM Identity Center managed credentials or using your existing credentials with a SAML 2.0 identity provider.
This command integrates AWS CLI with IAM Identity Center very nicely. To use the AWS CLI you would first sign in to your IAM Identity Center login portal through your web browser:

Then you use the following AWS CLI command to log in using your SSO session:
aws sso login --profile ${configured-sso-profile-name}
The command will open up a new page in your web browser, asking you to authorize the request.
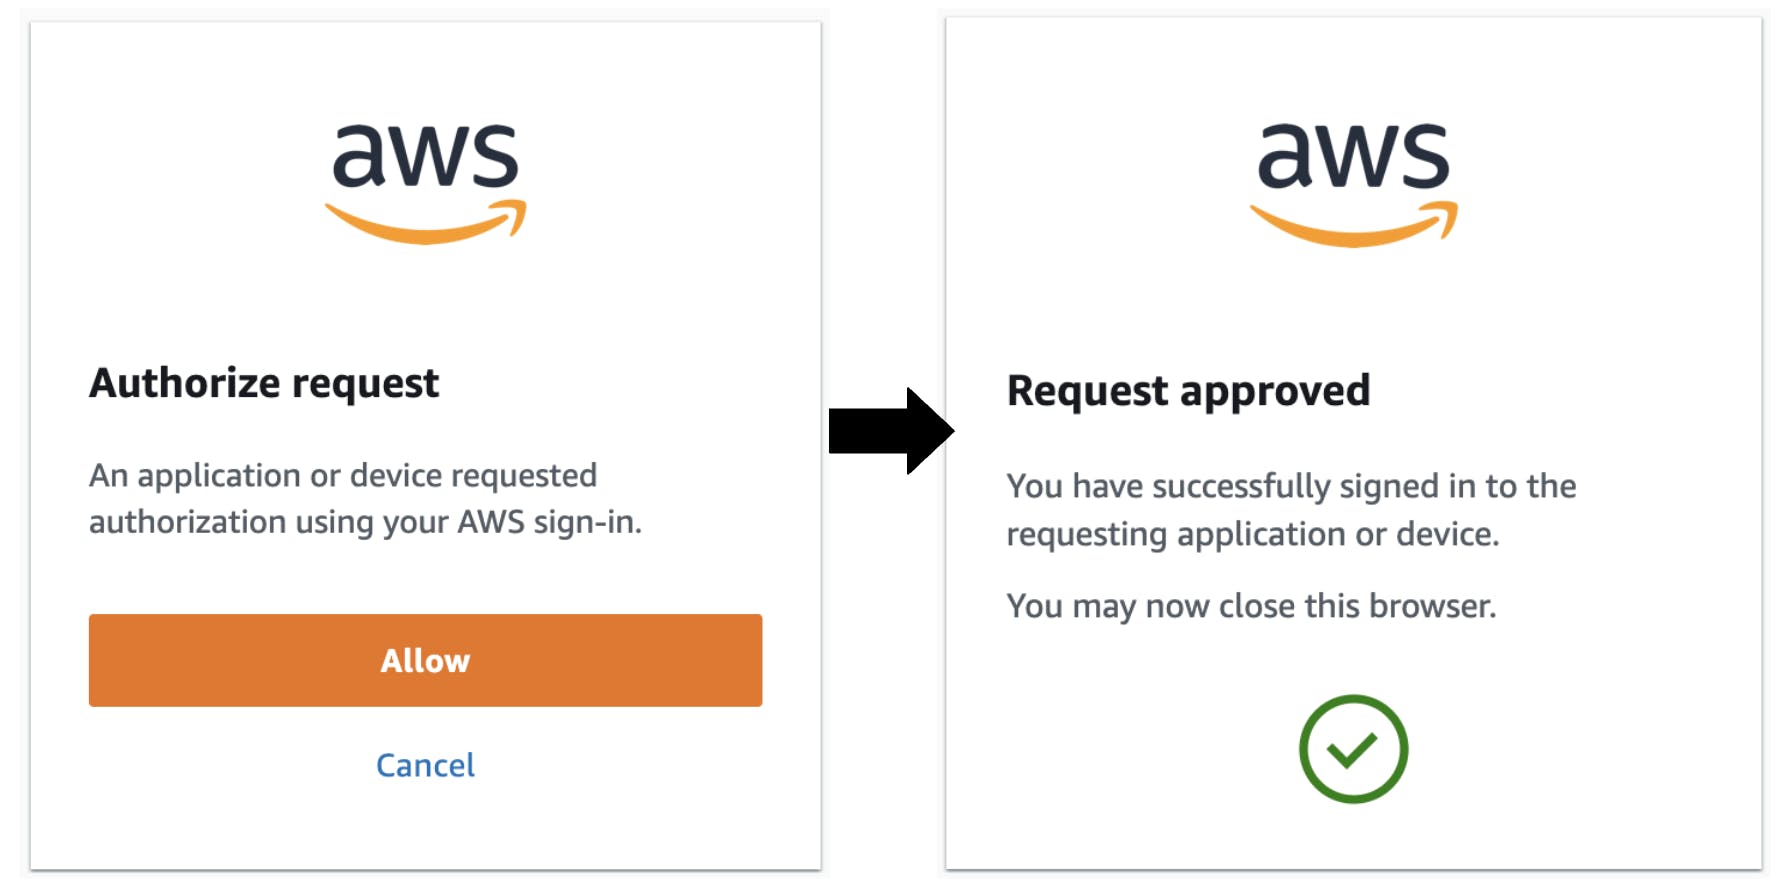
Once you have authorized, you can use the profile to run any further AWS commands, for example:
aws s3 ls --profile ${configured-sso-profile-name}
Before using the aws sso login command, you will first need to configure a profile. For more information see https://docs.aws.amazon.com/cli/latest/userguide/cli-configure-sso.html.
1 - aws sts get-caller-identity
Number one on my list is a command that simply retrieves the details about the IAM credentials you are using to perform AWS CLI commands.
$ aws sts get-caller-identity

{
    "UserId": "ABCA5DEFAJDAEIQXYZZG3:freddy.ho@example.com",
    "Account": "123456789012",
    "Arn": "arn:aws:sts::123456789012:assumed-role/AWSReservedSSO_AWSAdministratorAccess_123abc456efg0000/freddy.ho@example.com"
}
This is my number one command because it allows me to make sure I am performing AWS CLI commands in the correct AWS account.
You could end up having a bad day if you use the wrong set of credentials and make unintended changes in the wrong AWS account. It could be a terrible day if this was destructive action in a production account.
To avoid this situation, I make it a habit to always run this command first and check before I begin running any other AWS CLI commands.