


Table of contents
Introduction
There are several situations where you may want to redirect traffic from your website or webservice to a different URL. One example of this is when you have an outage of your website and want to temporarily redirect traffic to another page, such as a maintenance message page. This is can be performed by using HTTP redirects.
In this blog post I will describe four serverless methods in which you can perform HTTP redirects using AWS. Your source web resource (website or webservice that you wish to redirect away from) does not need to be hosted on AWS to achieve this. You only require access to change the DNS record entry of your web resource.
What is a HTTP redirect?
The HTTP is the protocol that we use to serve websites and other web content. This protocol is used for the communication between the web browser and web server. The HTTP protocol provides several types of responses to perform redirections. The two that are most commonly used are:
HTTP status code 301 - For permanent redirections.
HTTP status code 302 - For temporary redirections.
These HTTP redirect responses contain a Location header which species the redirect destination URL.
Note that web browsers will cache HTTP code 301 responses for permanent redirects. This means if your websites send a 301 permanent redirect response, visitors to your website will continue to go to the redirected location until their cache expires and you will not be able to undo this. If you only want to temporarily redirect traffic, then use HTTP code 302 response. It is recommended to use 302 temporary redirects first for testing before using 301 permanent redirects.
Prerequisite - Manage your DNS record
Access to manage your DNS record of your site (that users will go to before being redirected) is a prerequisite for all the HTTP redirect methods covered in this blog post. This is essentially so that you can update your DNS record to point to AWS services that will carry out the HTTP redirect. You can use your own DNS service, however this post will use the AWS DNS service, Route53 for examples.
Your DNS record type should be a CNAME record. This is so that we are able point to the domain names of the AWS services performing the HTTP redirect.
If your intending to use any of the HTTP redirect methods for mitigating an outage of your site, then you should also consider changing your DNS record TTL to a small number such as 5 minutes or less. This allows you to make DNS changes that are experienced by your users sooner.
Which HTTP redirect method to choose?
There are many different ways to perform HTTP redirects using AWS. The best way for you will depend on your individual requirements of how you wish to redirect. The four serverless HTTP redirects methods I will describe should cover most general cases.
To help you identify which HTTP redirect method would best suit you, refer to the table below for a summary of each methods capabilities.

Use the links below to quickly take you to the method description:
Method 2 - Amazon CloudFront, Amazon S3 and AWS Certificate Manager
Method 3 - Amazon CloudFront with CloudFront Function and AWS Certificate Manager
Method 4 - Amazon CloudFront with Lambda@Edge and AWS Certificate Manager
Method 1: S3 Static Website Redirect
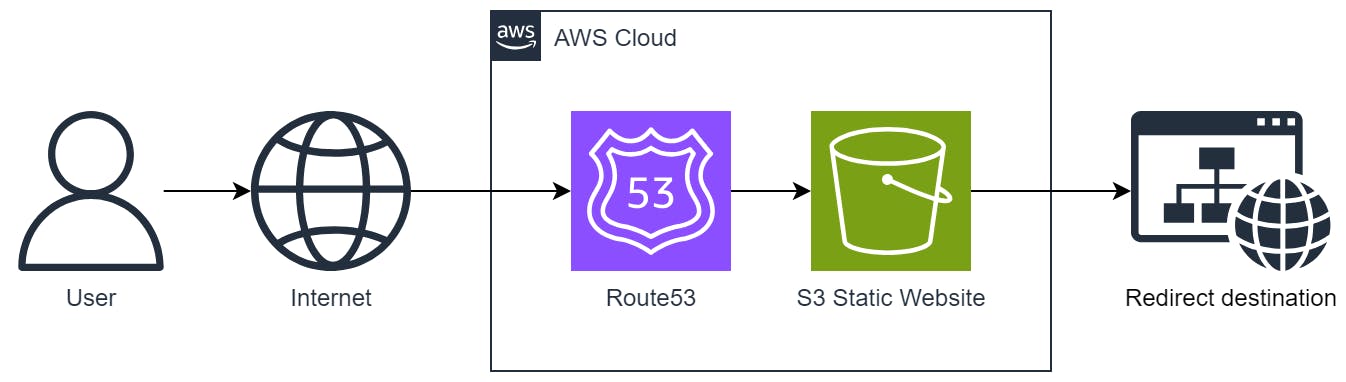
Amazon S3 is able to host static websites that can be configured to perform webpage redirects. We can use the webpage redirect feature without hosting any static website content.
This HTTP redirect method is the simplest to set up and only requires the Amazon S3 service. However, the main downside of this method is that it can only support HTTP requests with no SSL/TLS certificate. S3 is not able to host a SSL/TLS certificate alone. To support SSL/TLS certificates, see the other methods in this blog post.
Create S3 Bucket
To create the S3 bucket, in the AWS S3 Console, choose Create bucket.
To use S3 Static Website Redirect an S3 Bucket needs to be created with a Bucket name that is the same as the CNAME record name of the site that you are redirecting from.
In the example below, my site CNAME record is freddy-test-redirect.sandpit-example.com which I also use as the name for creating a new S3 bucket.

Choose Create bucket to create the bucket with default options which is set to block all public access. Public access is not required as we are not serving any objects from S3 at all, we are only redirecting.
After your bucket is created, you can configure redirects by going to your bucket then under the Properties tab, in the Static website hosting choose Edit.
Under Static website hosting, select Enable.
At this point you have two options for configuring the redirect.
S3 Static website hosting option: Redirect requests for an object
The simplest option is to select Redirect requests for an object under Hosting type. This allows you to perform permanent redirects (code 301) for all requests to your domain to another domain and optional path. You also have the option under Protocol, to set the redirect location protocol to http or https, otherwise set to none to keep the same protocol as the request.
The example configuration below will make all requests to my site at http://freddy-test-redirect.sandpit-example.com be permanently redirected (code 301) to http://freddyho.hashnode.dev/top-10-aws-cli-commands.

S3 Static website hosting option: Host a static site
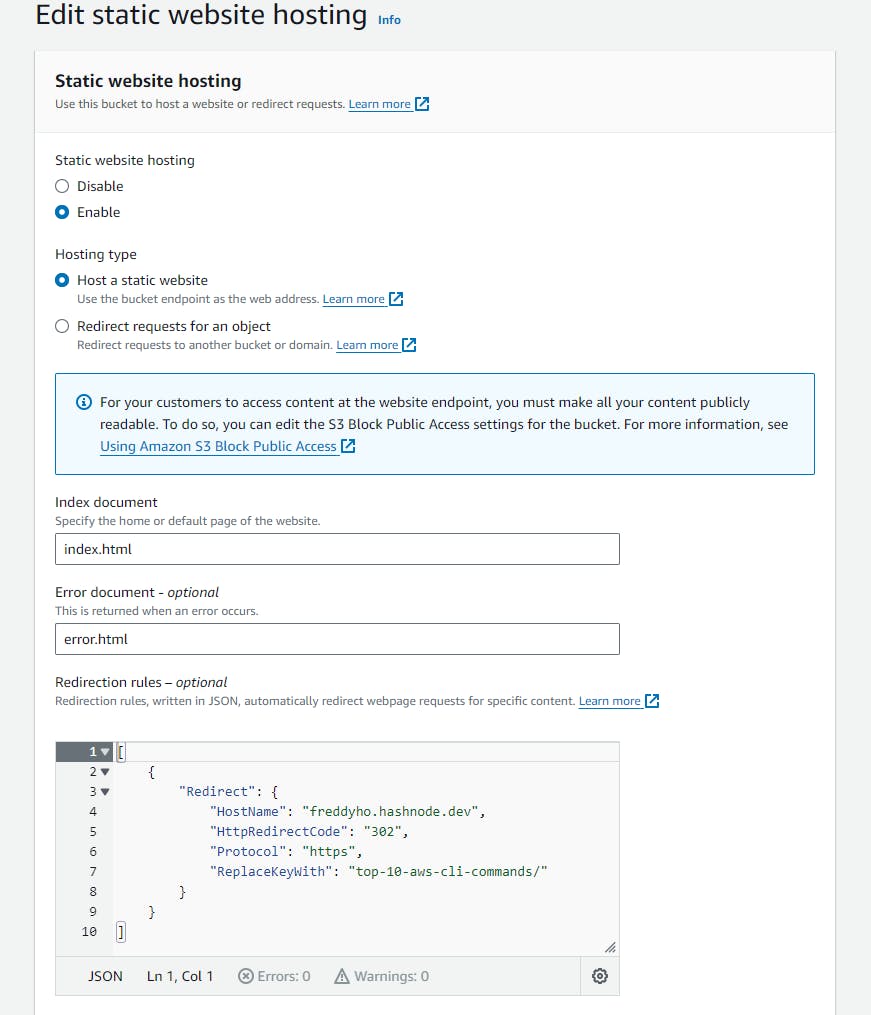
The other option under Hosting type is Host a static website. This provides more flexibility to choose the redirect status code and perform some simple logic to alter redirect location. After selecting Host a static website, additional configuration will become available.
Under Index document, you must specify an object such a index.html. This object does not need exist in your S3 bucket since we will be redirecting all requests and not serving any static website content. The same idea applies to the optional field Error document.
Under Redirection rules we can then add a rule written in JSON to control the redirection response. The following redirect rule will perform a temporary redirect (code 302) of all requests to https://freddyho.hashnode.dev/top-10-aws-cli-commands.
[
    {
        "Redirect": {
            "HostName": "freddyho.hashnode.dev",
            "HttpRedirectCode": "302",
            "Protocol": "https",
            "ReplaceKeyWith": "top-10-aws-cli-commands/"
        }
    }
]
The full configuration looks for the redirect static website is below.
The redirect rule field ReplaceKeyWith will set a fixed path for the redirect location URL. If you want to insert a path prefix to the original request URL to be used as the redirect location and also retain query parameters, you can use instead the ReplaceKeyPrefixWith.
For example, by changing the previous example rule to use "ReplaceKeyPrefixWith": "top-10-aws-cli-commands/", a request to http://freddy-test-redirect.sandpit-example.com/extra-path?querystring=foobar will be redirected to https://freddyho.hashnode.dev/top-10-aws-cli-commands/extra-path?querystring=foobar.
You can also specify conditions for when a redirect rule should apply. In the below example, a condition has been added for any requests with a path that starts with "alternate/" (such as http://freddy-test-redirect.sandpit-example.com/alternate/extra-path). These requests will be redirected to https://freddyho.hashnode.dev/better-logging-in-aws-lambda-for-python-newbies/. All other requests will continue to be redirected to https://freddyho.hashnode.dev/top-10-aws-cli-commands.
[
    {
        "Condition": {
            "KeyPrefixEquals": "alternate/"
        },
        "Redirect": {
            "HostName": "freddyho.hashnode.dev",
            "HttpRedirectCode": "302",
            "Protocol": "https",
            "ReplaceKeyWith": "better-logging-in-aws-lambda-for-python-newbies/"
        }
    },
    {
        "Redirect": {
            "HostName": "freddyho.hashnode.dev",
            "HttpRedirectCode": "302",
            "Protocol": "https",
            "ReplaceKeyWith": "top-10-aws-cli-commands/"
        }
    }
]
Redirect rules can be further explained here: https://docs.aws.amazon.com/AmazonS3/latest/userguide/how-to-page-redirect.html
Update DNS to point to the S3 redirect
After you have set up your S3 Bucket to perform redirects, all that is left is to update your DNS with a CNAME record to point to the S3 bucket domain. This should be visible in the Static website hosting section of you S3 bucket configuration (under Properties tab), within the Bucket website endpoint. For more information about S3 Bucket website endpoints, see: https://docs.aws.amazon.com/AmazonS3/latest/userguide/WebsiteEndpoints.html)
For the examples we have been using, the Bucket website endpoint is: http://freddy-test-redirect.sandpit-example.com.s3-website-ap-southeast-2.amazonaws.com
The domain portion is after the http://, i.e. freddy-test-redirect.sandpit-example.com.s3-website-ap-southeast-2.amazonaws.com
In this example we are using Amazon Route53 as the DNS service, however you can use any DNS service that support CNAME record creation.

If you are using Route53 you also have the alternative (and preferred) option to create an alias record.

Method 2: CloudFront with S3 Static Website Redirect
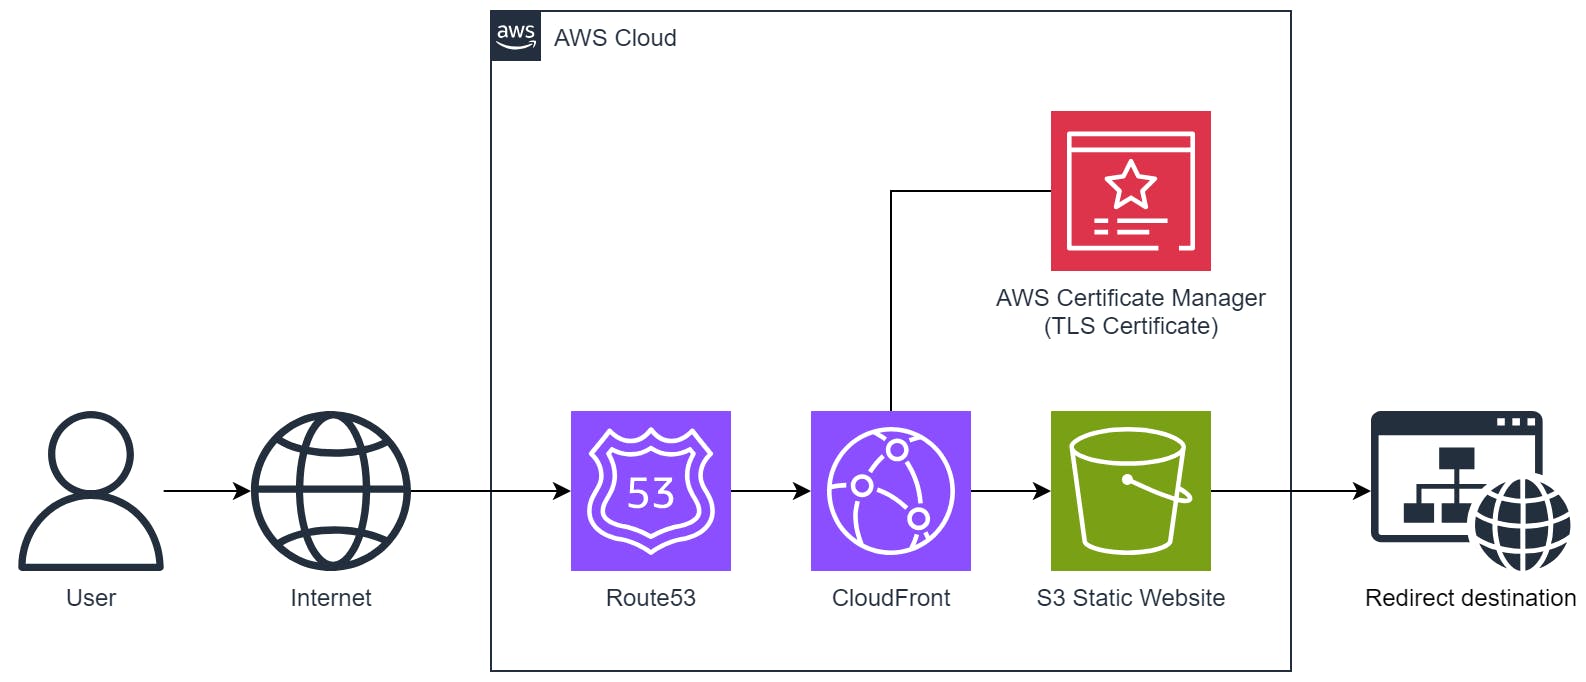
This method builds upon the first method where an S3 Bucket configured as a static website is used perform the redirect. However, to provide the capability to support HTTPS requests with SSL/TLS certificate, we use Amazon CloudFront with AWS Certificate Manager (ACM).
To create the S3 Bucket, follow the same steps as Method 1: S3 Static Website Redirect, then come back here for the instructions to set up CloudFront and ACM.
Create a SSL/TLS certificate for your domain in ACM
To support HTTPS requests, we will need to serve a SSL/TLS certificate. Public SSL/TLS certificates can be created by AWS Certificate Manager (ACM) for free. Better yet, when the certificate is in use (by being attached to an AWS resource which will be CloudFront in our case), the certificate will automatically renew itself. We therefore do not need to worry about regularly swapping the certificate.
In order for the ACM certificate to be used by CloudFront, we need to create the certificate in the US East (N. Virginia) us-east-1 region. The certificate can be created in the AWS Certificate Manager Console by choosing Request Certificate then selecting Request a public certificate.
Provide your Fully qualified domain name. For our example this is freddy-test-redirect.sandpit-example.com.
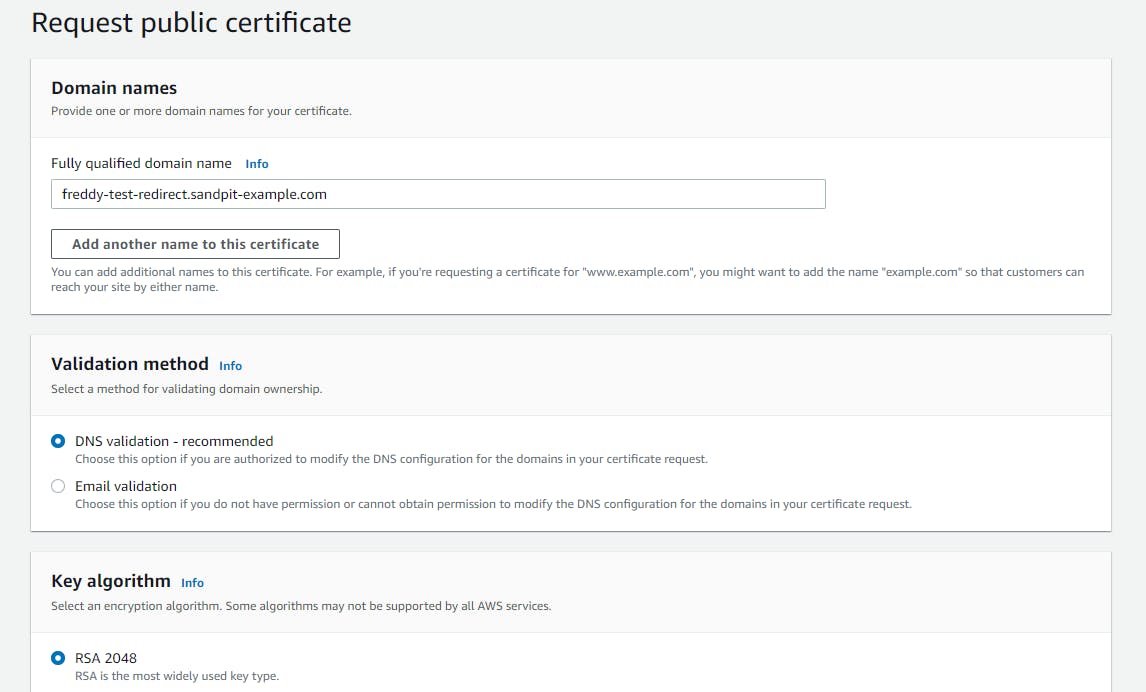
For Validation method, it is recommended to use DNS validation. This will require you to create a special CNAME record to verify ownership of the domain. For more information, see https://docs.aws.amazon.com/acm/latest/userguide/domain-ownership-validation.html
Create a CloudFront distribution with S3 hosted site origin
To create a CloudFront distribution, go to the Amazon CloudFront console. If this is your first time creating a CloudFront distribution then on the welcome page, choose Create a CloudFront distribution. Otherwise if you already have existing distributions, then under Distributions choose Create distribution.
Under Origin domain start typing your bucket name then select it. This should then detect that the bucket is configured with static web hosting enabled and ask you if want to use the S3 website endpoint. Do so by choosing Use website endpoint.

If you are not prompted with the option to chose the S3 website endpoint, then you can type it in manually. You can locate you S3 website endpoint in the Static website hosting section of you S3 bucket configuration (under Properties tab), under Bucket website endpoint.
Ensure that what has been entered under Origin domain is the S3 website endpoint which has the following format:
<BUCKET_NAME>.s3-website-<AWS_REGION>.amazonaws.com
Leave the Protocol selected as HTTP only and HTTP port as 80.

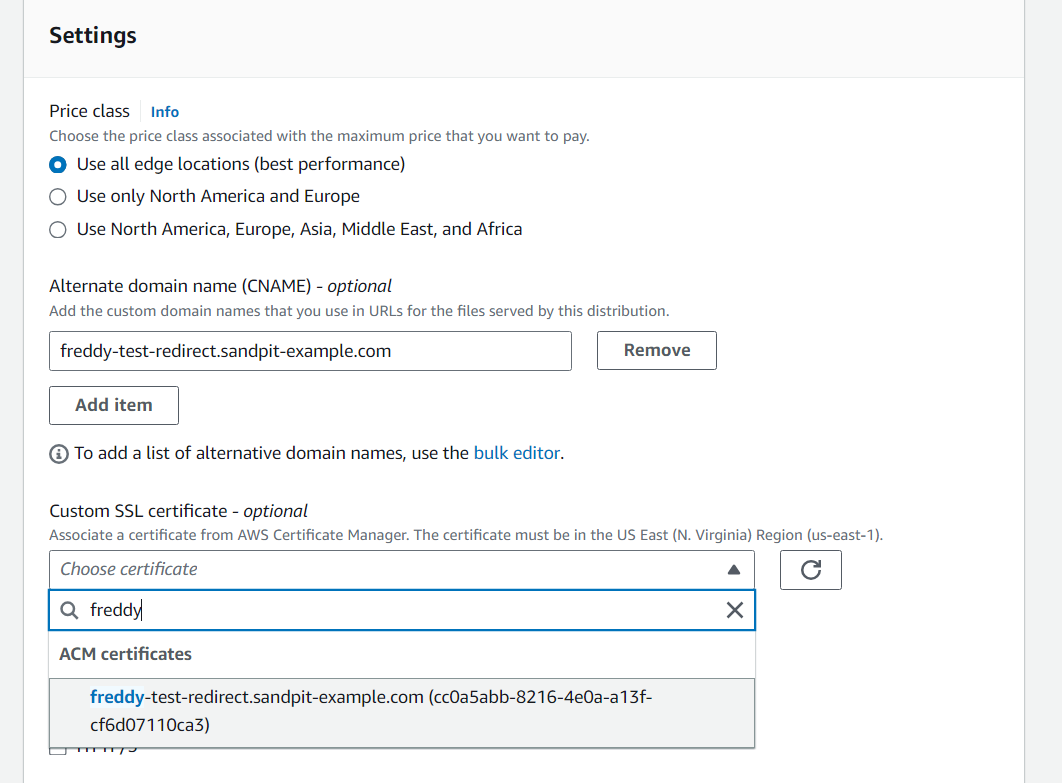
Scroll down and under Settings, under Alternate domain name (CNAME), type in your CNAME (the domain name of your website that you want to redirect away from).
Under Custom SSL certificate, choose your created SSL/TLS certificate.

Leave all other settings as default, the choose Create distribution.
The creation of the CloudFront distribution will take some time (a few minutes in my experience).
Update DNS to point to CloudFront distribution
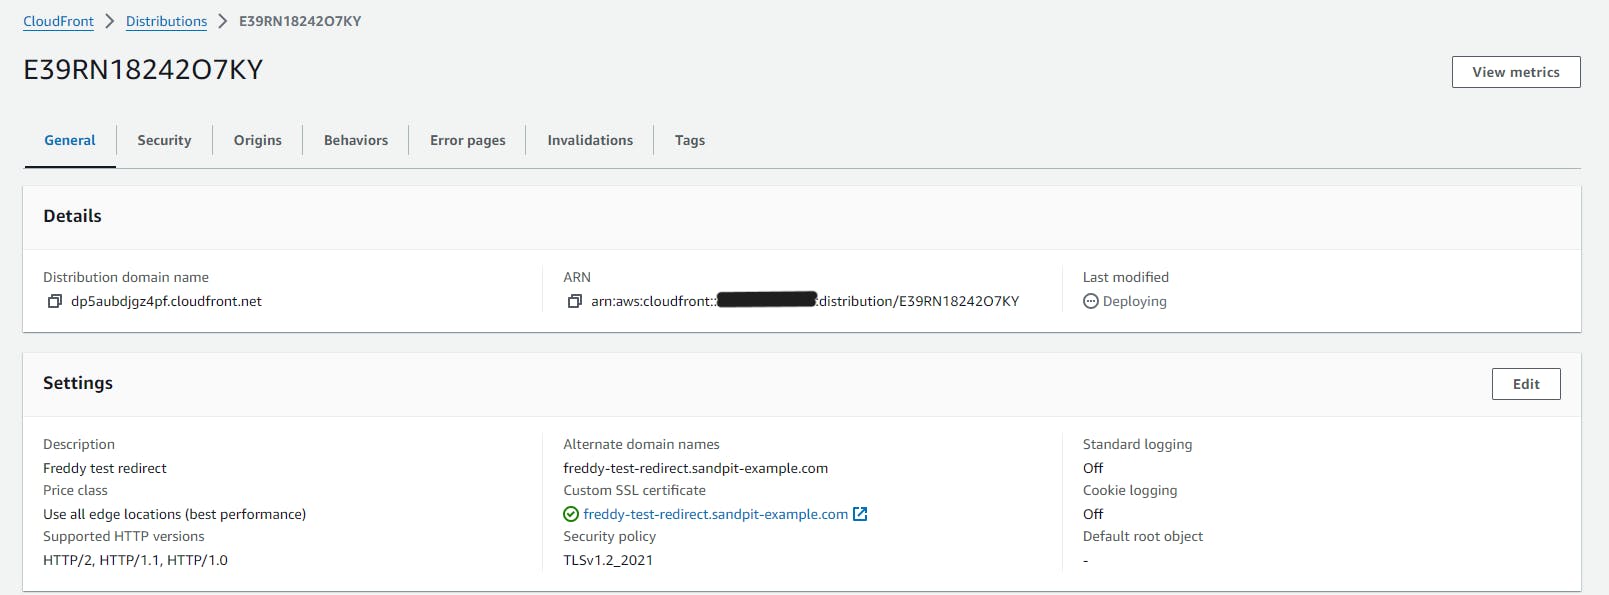
After the CloudFront distribution is created you will need to update your DNS with a CNAME record to point to the distribution domain name. This should be visible in your selected distribution, under the General tab, under Details, Distribution domain name.
In this example we are using Amazon Route53 as the DNS service, however you can use any DNS service that support CNAME record creation.

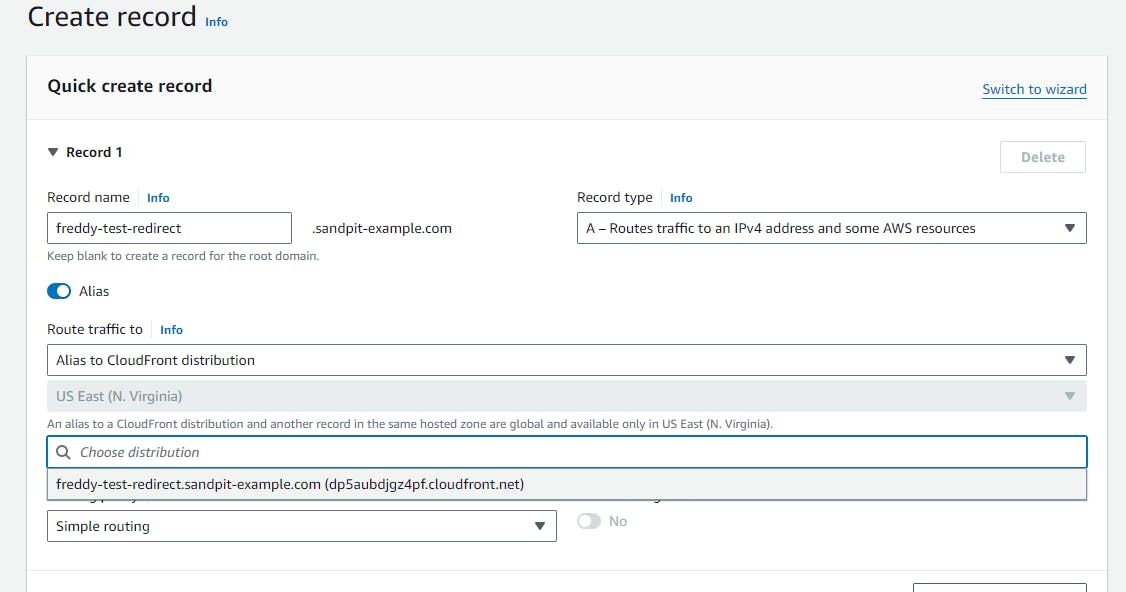
If you are using Route53 you also have the alternative (and preferred) option to create an alias record.
Method 3: CloudFront with CloudFront Functions

Amazon CloudFront provides edge functions services such as CloudFront Functions and Lambda@Edge. In this method we are using a CloudFront Function to perform the HTTP redirect. The CloudFront Function allows you to write your redirect logic in JavaScript. When a CloudFront distribution receives a request (viewer request event source), it can then invoke the CloudFront Function which provides the redirect response.
CloudFront Functions are for lightweight and short running coded logic. Below are some of the limits of CloudFront Functions to be aware of:
Function duration: sub-millisecond
Maximum memory: 2 MB
Maximum size of the function code and included libraries: 10 KB
Access to request body: No
If you require more complex logic using either Node.js or Python, have a look at Method 4: CloudFront with Lambda@Edge.
For a comparison between CloudFront Functions and Lambda@Edge see: https://docs.aws.amazon.com/AmazonCloudFront/latest/DeveloperGuide/edge-functions-choosing.html
Create a CloudFront distribution with custom origin
A CloudFront distribution is required to service incoming requests by executing edge functions and also serving SSL/TLS certificates (with ACM). A CloudFront distribution is required to have at least one origin which acts as the original source of content to serve requests. However, if you intend redirect all your requests, then the choice of the origin does not matter because we will not be forwarding any requests to the origin.
This step shows how to quickly create a CloudFront distribution using a custom origin. Besides requiring an ACM certificate, no other AWS resources are required for creating the CloudFront distribution. If you have not yet created a required SSL/TLS certificate in AWS Certificate Manager (ACM), create one by following this step, then come back here.
To create the CloudFront distribution with a custom origin, go to the Amazon CloudFront console. If this is your first time creating a CloudFront distribution then on the welcome page, choose Create a CloudFront distribution. Otherwise if you already have existing distributions, then under Distributions choose Create distribution.
Under Origin domain, enter any domain name. Note, that we will not be forwarding any requests to this origin thus this can be set to any domain. Set an appropriate Protocol and Port for the domain.

Under Cache key and origin requests, under Cache policy, select CachingDisabled.

Scroll down and under Settings, under Alternate domain name (CNAME), type in your CNAME (the domain name of your website that you want to redirect away from).
Under Custom SSL certificate, choose your created SSL/TLS certificate.
Leave all other settings as default, the choose Create distribution.
The creation of the CloudFront distribution will take some time (a few minutes in my experience).
Create a CloudFront Function
In this step we will create a CloudFront function which provides a temporary redirect response (code 302) for all requests.
To create a CloudFront Function, go to the Amazon CloudFront console. Under Functions, choose Create function.
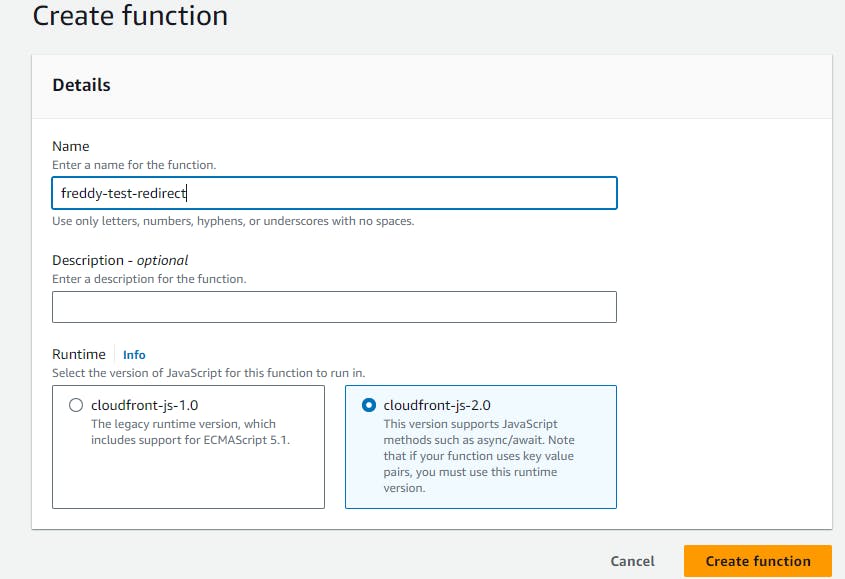
Under Details, provide a Name for you function. Under Runtime, select cloudfront-js-2.0, then choose Create function.
Under the Build tab, in the Function code section, under Development tab, paste the following code:
function handler(event) {
    const destinationUrl = 'https://freddyho.hashnode.dev/my-highlights-of-going-to-aws-reinvent-2023';

    var response = {
        statusCode: 302,
        statusDescription: 'OK',
        headers:
            { "location": { "value": destinationUrl } }
    };
    return response;
}
You can change the value for destinationUrl to your desired redirect destination URL.

Choose Save changes, then under the Publish tab choose Publish function.
To associate the CloudFront Function to your CloudFront distribution, go back to your CloudFront distribution settings under Distribution.
Under the Behaviors tab, select the behavior item with Path pattern Default (*), then choose Edit.
Scroll down and under the Function associations section, on the Viewer request field, for Function type select CloudFront Functions. For the Function ARN / Name select your CloudFront Function name. Finally, choose Save changes.

For other examples of CloudFront Functions, see: https://docs.aws.amazon.com/AmazonCloudFront/latest/DeveloperGuide/functions-example-code.html
Update DNS to point to CloudFront distribution
To complete the HTTP redirection setup, all that is left is to update your DNS with a CNAME record to point to the CloudFront distribution domain name. For examples on how to do this using Route53 see here.
Method 4: CloudFront with Lambda@Edge
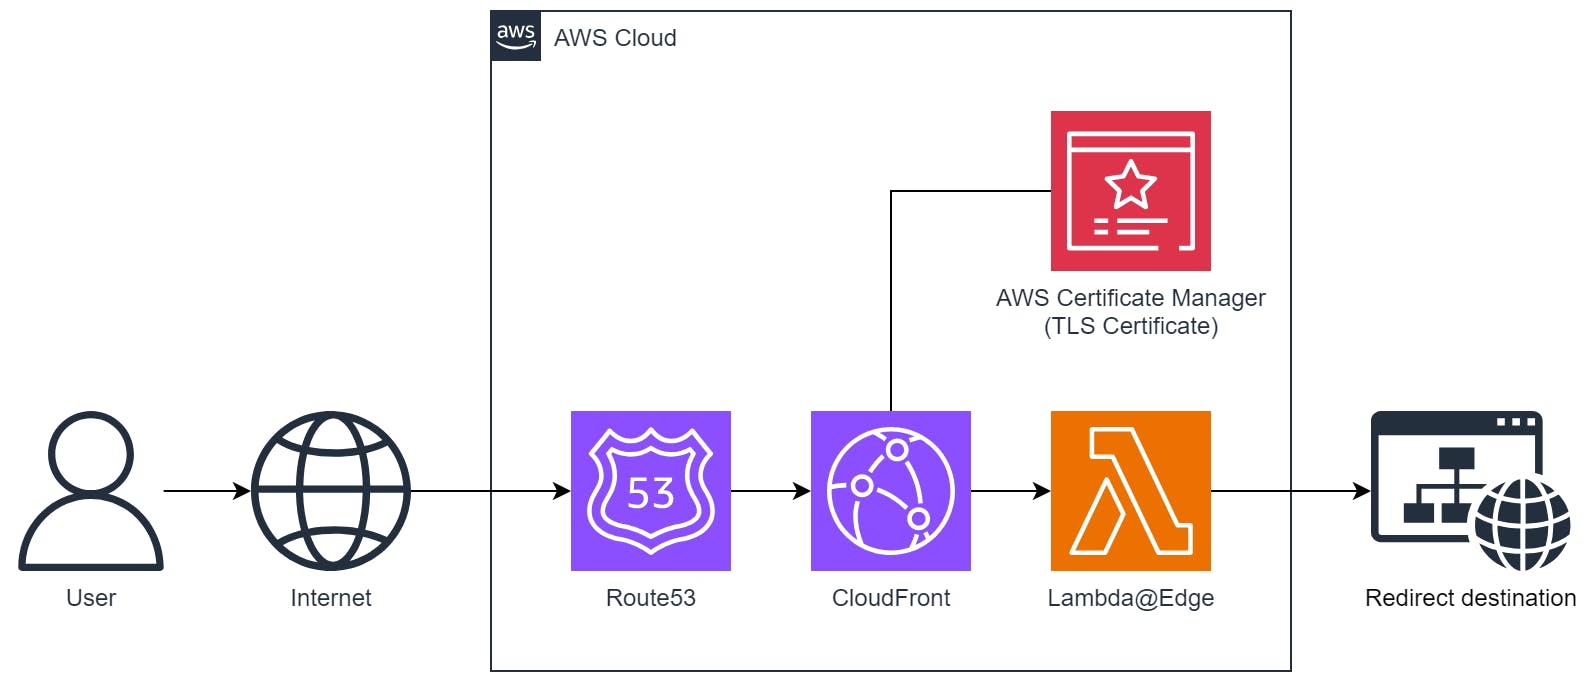
Similar to the previous method using CloudFront Functions, this method uses Lambda@Edge where you can write you own logic to perform HTTP redirects. Lambda@Edge functions can be written in either Node.js or Python.
Lambda@Edge allows you to perform more complex logic than CloudFront Functions. Some additional capabilities include usage of third-party libraries such as AWS SDK and network access to external services. Below are some of the limits of Lambda@Edge to be aware of:
Function duration: 5 seconds (for viewer request and viewer response)
Maximum memory: 128 - 3,008 MB
Maximum size of the function code and included libraries: 1 MB (for viewer request and viewer response)
Access to the request body: Yes
For a comparison between CloudFront Functions and Lambda@Edge see: docs.aws.amazon.com/AmazonCloudFront/latest..
Create a CloudFront distribution for Lambda@Edge
This method which uses Lambda@Edge to produce the redirect response uses the same CloudFront distribution setup as CloudFront Functions. To set this up see here.
Create IAM role for Lambda@Edge function
The Lambda@Edge function requires an AWS IAM role.
To create the IAM role in the AWS IAM Console, under Access management then Roles, choose Create Role.
In the Select trust entity step, in the Trusted entity type section select Custom trust policy, then in the Custom trust policy field past the following policy, then choose Next.
{
   "Version": "2012-10-17",
   "Statement": [
      {
         "Effect": "Allow",
         "Principal": {
            "Service": [
               "lambda.amazonaws.com",
               "edgelambda.amazonaws.com"
            ]
         },
         "Action": "sts:AssumeRole"
      }
   ]
}
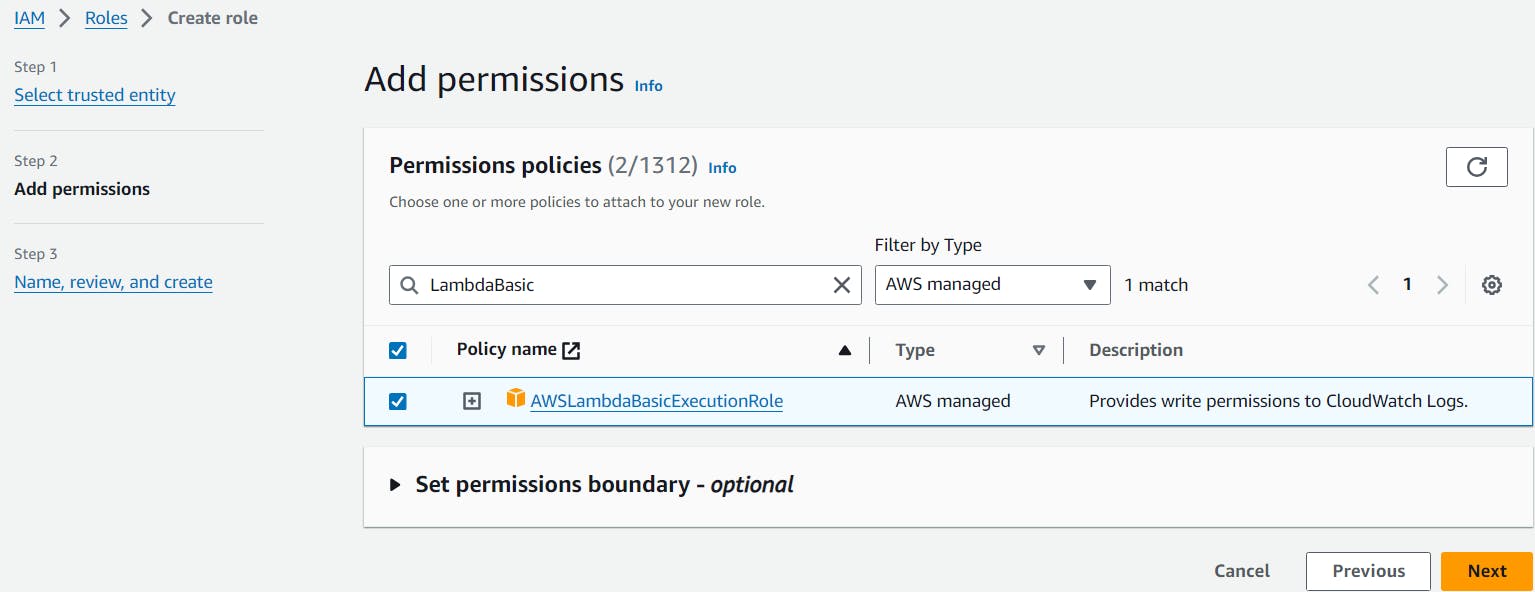
In the Add permissions step, add the AWS managed policy AWSLambdaBasicExecutionRole then choose Next. This policy provides the permissions for the Lambda function to write to CloudWatch Logs.
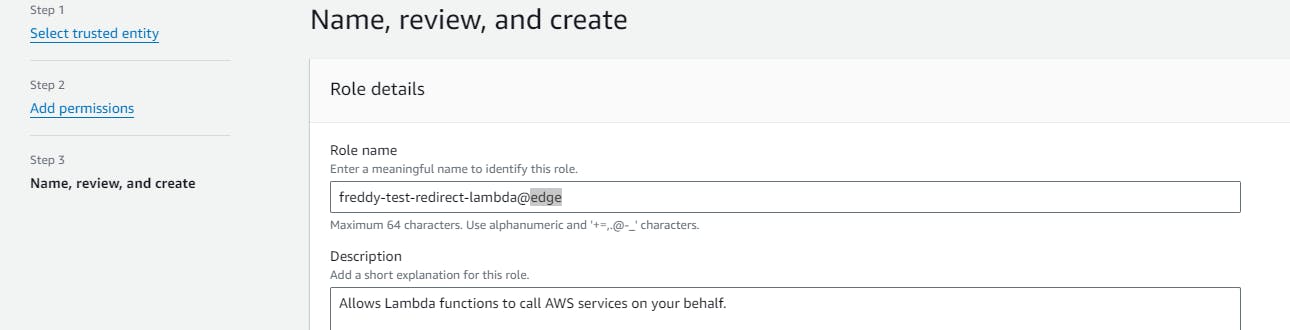
In the Name, review and create step, provide a Role name then choose Create role.
Create Lambda@Edge function
In this step we will create a Lambda@Edge function which provides a temporary redirect response (code 302) for all requests.
Lambda@Edge functions need to be created in the US East (N. Virginia) region. Ensure your AWS Console is set to US East (N. Virginia) us-east-1 region before proceeding.
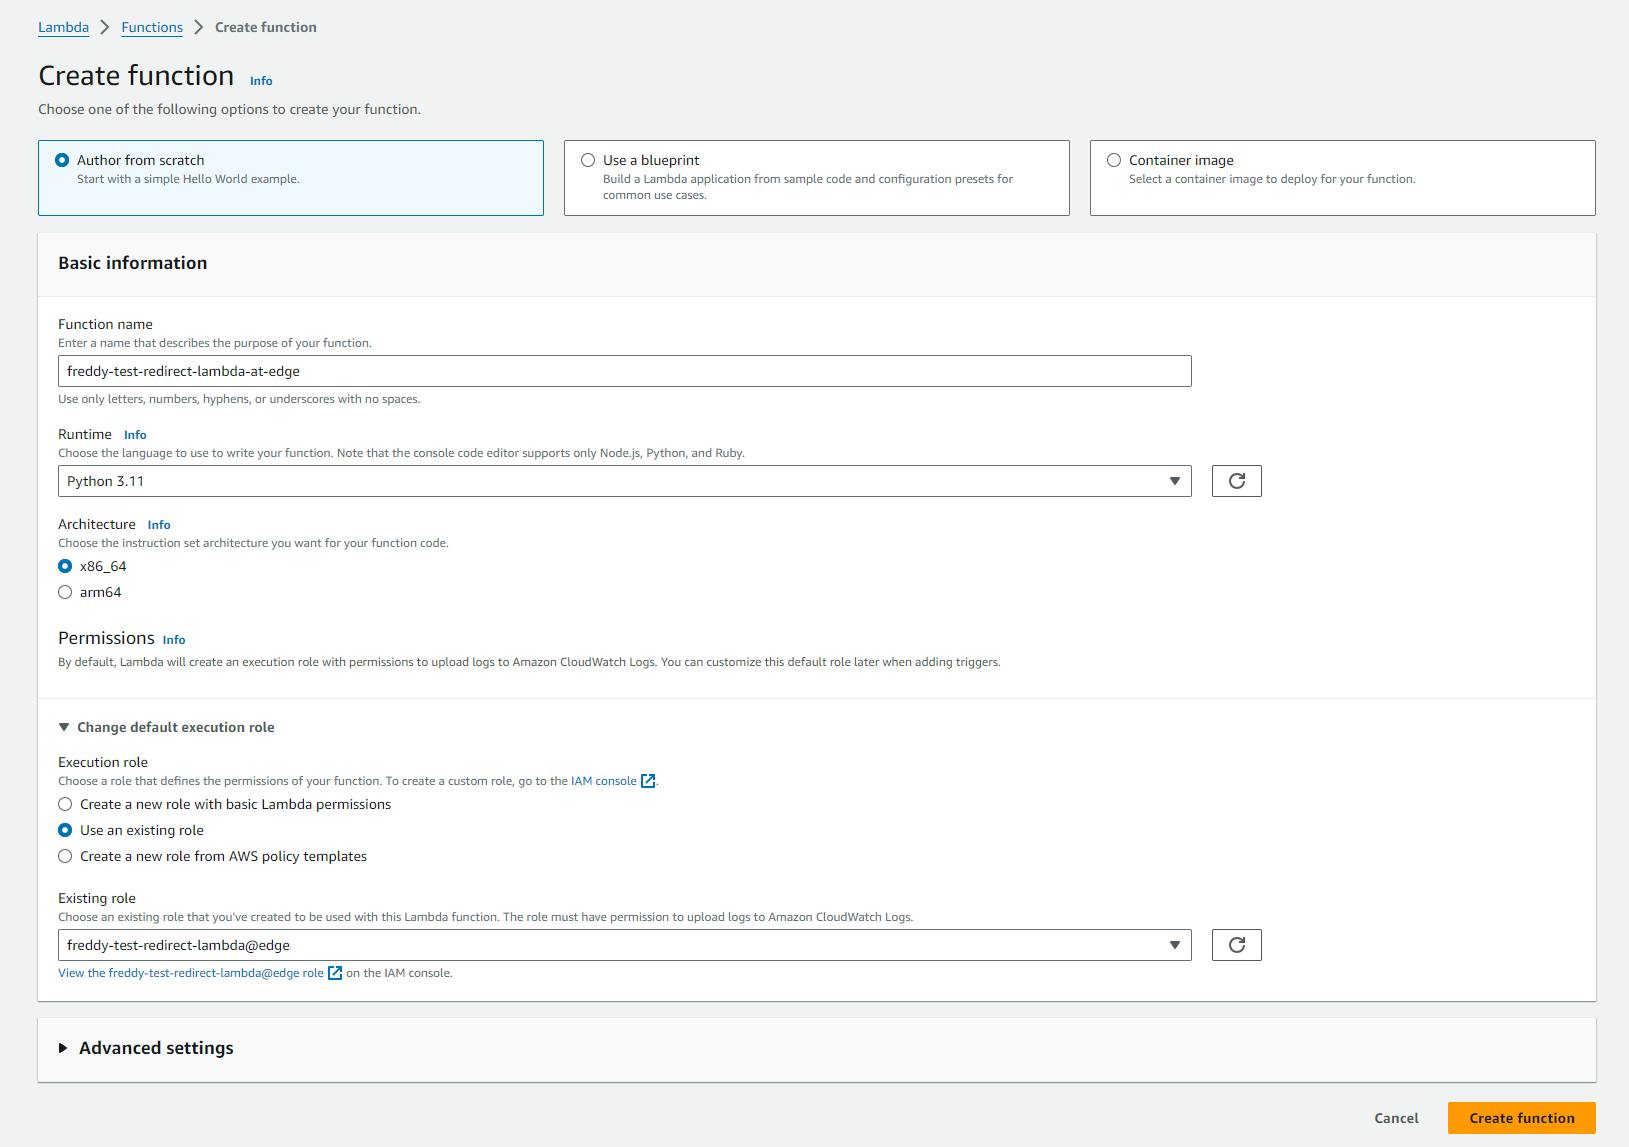
To create the Lambda@Edge function, in the AWS Lambda Console, under Functions, choose Create function.
Select Author from scratch.
Provide a Function name and for Runtime select Python3.11.
Expand the Change default execution role section, then under Execution role select Use an existing role and select your created role. Next, choose Create function.
Under the Code tab, in the in-built code editor, paste the following code in to lambda_function.py.
destination_url = "https://freddyho.hashnode.dev/better-logging-in-aws-lambda-for-python-newbies"

def lambda_handler(event, context):

    # Generate HTTP redirect response with 302 status code and Location header.
    response = {
        "status": "302",
        "statusDescription": "Found",
        "headers": {
            "location": [{
                "key": "Location",
                "value": destination_url
            }]
        },
    }

    return response
You can change the value for destination_url to your desired redirect destination URL.
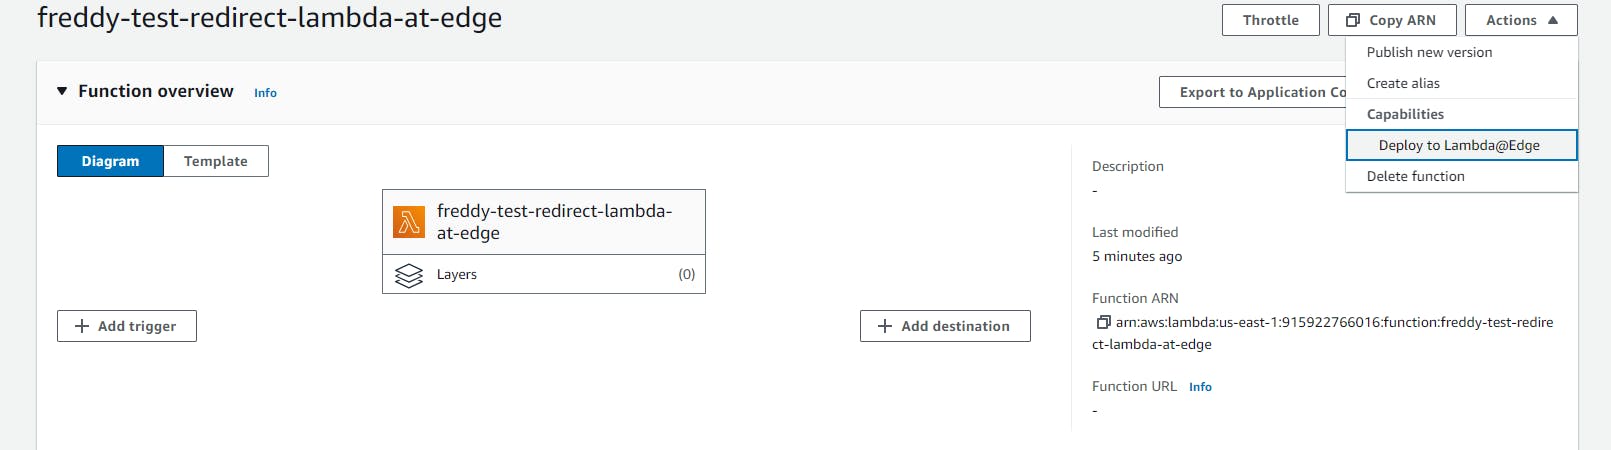
Choose File > Save All, then choose Deploy.
To deploy your Lambda function to the Edge, under the Actions drop down, under Capabilities choose Deploy to Lambda@Edge.
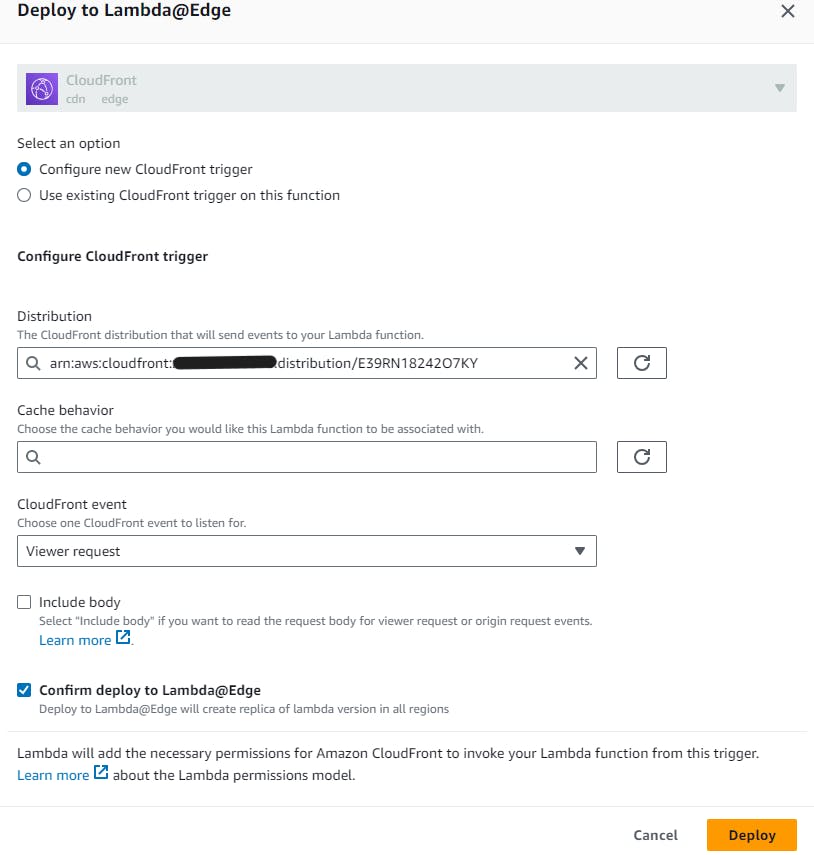
Under Distribution, search and select your distribution.
Under CloudFront event, choose Viewer request.
Finally, check Confirm deploy to Lambda@Edge then choose Deploy. It will take some time for you Lambda@Edge to deploy.
Update DNS to point CloudFront distribution
To complete the HTTP redirection setup, all that is left is to update your DNS with a CNAME record to point to the CloudFront distribution domain name. For examples on how to do this using Route53 see here.
Conclusion
In this blog post we covered four serverless methods to perform HTTP redirects using AWS. The AWS services that were used in these methods included Amazon S3, Amazon CloudFront, CloudFront Functions and Lambda@Edge.
The choice of which of the four redirect methods to choose from depends on your redirect response requirements. Simpler redirect methods only provide HTTP support and basic redirect logic, whereas other redirect methods can provide HTTPS support and redirect response logic written in Javascript, Node.js or Python.
To use any of the redirect methods covered, access to manage your DNS record of your site is required. The DNS record of incoming requests needs to be updated to point to an AWS service which will provide the HTTP redirect response.