AWS CodePipeline, CodeBuild and shared subnets for cross-account RDS database updates

Introduction
In this blog post, we will look at how we can use a deployment pipeline to perform schema updates to an RDS database that is located in a separate workload AWS account. In a real-world scenario, RDS databases may be in different accounts (and separate VPCs) because you may have opted for a multiple AWS account strategy. For example, having separate AWS accounts for non-production and production environments.
Although this is a great way to organise and isolate different environments, it makes implementing automated deployment pipelines a bit more complex. Having disparate deployment pipelines in each account is hard to manage. Ideally, you would want a centralised place for your deployment pipeline to deploy to all your environments across your accounts. A centralised place will also allow you to oversee the promotion of releases as they move from non-production environments up to your production environment.
A good solution for this is to have a dedicated AWS account to host your deployment pipelines that can carry out cross-account deployments. This account is commonly known as a "tooling" account. Keep reading to see how this is achievable with AWS CodePipeline, AWS CodeBuild and sharing subnets.
Cross-account deployment scenario architecture
In this cross-account deployment scenario, our deployment will involve making database schema changes in AWS RDS. I will be using Liquibase which is a popular tool used to manage and apply database changes. To be able to run Liqubase against the RDS database, I will be using CodeBuild configured to run in a VPC with database connectivity.
A simple pipeline will be created in AWS CodePipeline that will consist of two stages:
Source stage - Clones the code repository (GitHub) containing the Liquibase change log and properties.
Deploy stage - Runs CodeBuild project which will use Liquibase to update the RDS database.
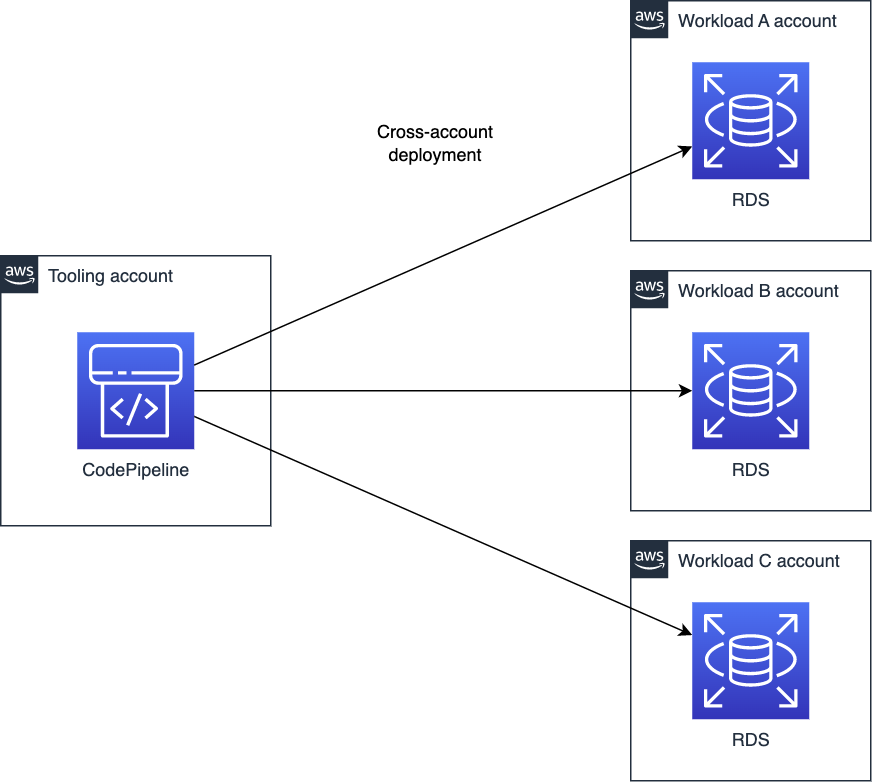
We will have a single account dedicated to hosting all the CodePipeline and CodeBuild resources. This account will be known as the "tooling" account. Its purpose is to hold the tools used to carry out builds and deployments across all the other AWS accounts. The RDS database is located in a separate account which will be known as the "workload" account.
The magic part that enables the cross-account deployment is the ability to share subnets across accounts. By taking advantage of this, we can share a subnet from the workload account with the tooling account. The tooling account can then have a CodeBuild project configured to launch in the shared subnet. From this shared subnet, we can reach the RDS database endpoint. We will look at Codebuild using shared subnets further in a later section.
The diagram below shows how everything hangs together.

Try it out
To make this demonstration easier, I have provided CloudFormation templates that will deploy all the required AWS cloud resources (VPC resource, RDS database (PostgreSQL) instance, Resource Share, CodePipline and CodeBuild). I've also provided step-by-step instructions on how to deploy it.
Prerequisites
The following items are prerequisites for deploying this demonstration example:
An AWS Organisation with at least two AWS accounts. One account is used as the workload account and another as the tooling account.
Enable resource sharing within AWS Organizations. See: https://docs.aws.amazon.com/ram/latest/userguide/getting-started-sharing.html#getting-started-sharing-orgs
GitHub account to be used as the source code repository for CodePipeline.
Source Code
All source code for this demonstration is available in the public repository on GitHub at https://github.com/FreddyCLH/aws-codepipeline-cross-account-liquibase.
Clone the repository using the following command:
git clone --branch main https://github.com/FreddyCLH/aws-codepipeline-cross-account-liquibase.git
Inside you will find CloudFormation template files (*cfn-template.yml) which we will use to deploy the demonstration resources.
.
├── codebuild-liquibase-sample
│   ├── buildspec.yml
│   ├── changelog.sql
│   └── liquibase.properties
├── tooling-account
│   └── codepipeline-cfn-template.yml
└── workload-account
    └── rds-shared-subnet-cfn-template.yml
Determine your workload and tooling accounts
Determine which AWS account you wish to use as the "workload" account and which one for the "tooling" account. Make note of their account IDs.
The workload account will be deployed with the workload resources which include the RDS database (PostgreSQL) instance and a subnet to be shared with the tooling account.
The tooling account will be deployed with CodePipeline and CodeBuild project.
Deploy the RDS database and shared subnet in the workload account
To deploy the resources using CloudFormation to the workload account:
In your workload account AWS Management Console, navigate to AWS CloudFormation at https://console.aws.amazon.com/cloudformation/
Select Create stack drop-down and choose With new resources (standard).

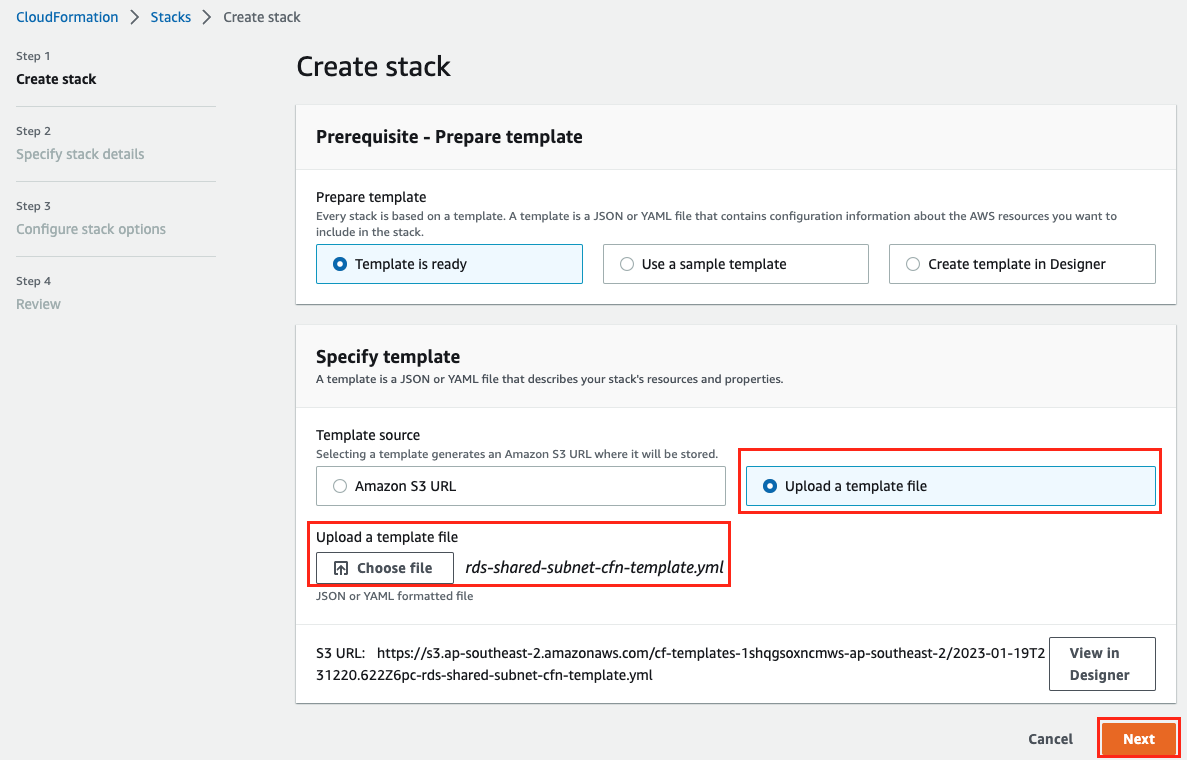
In the Specify template section, select Upload a template file and select Choose file. From the cloned repository aws-codepipeline-cross-account-liquibase, select the file workload-account/rds-shared-subnet-cfn-template.yml then choose Next.
Enter a stack name such as
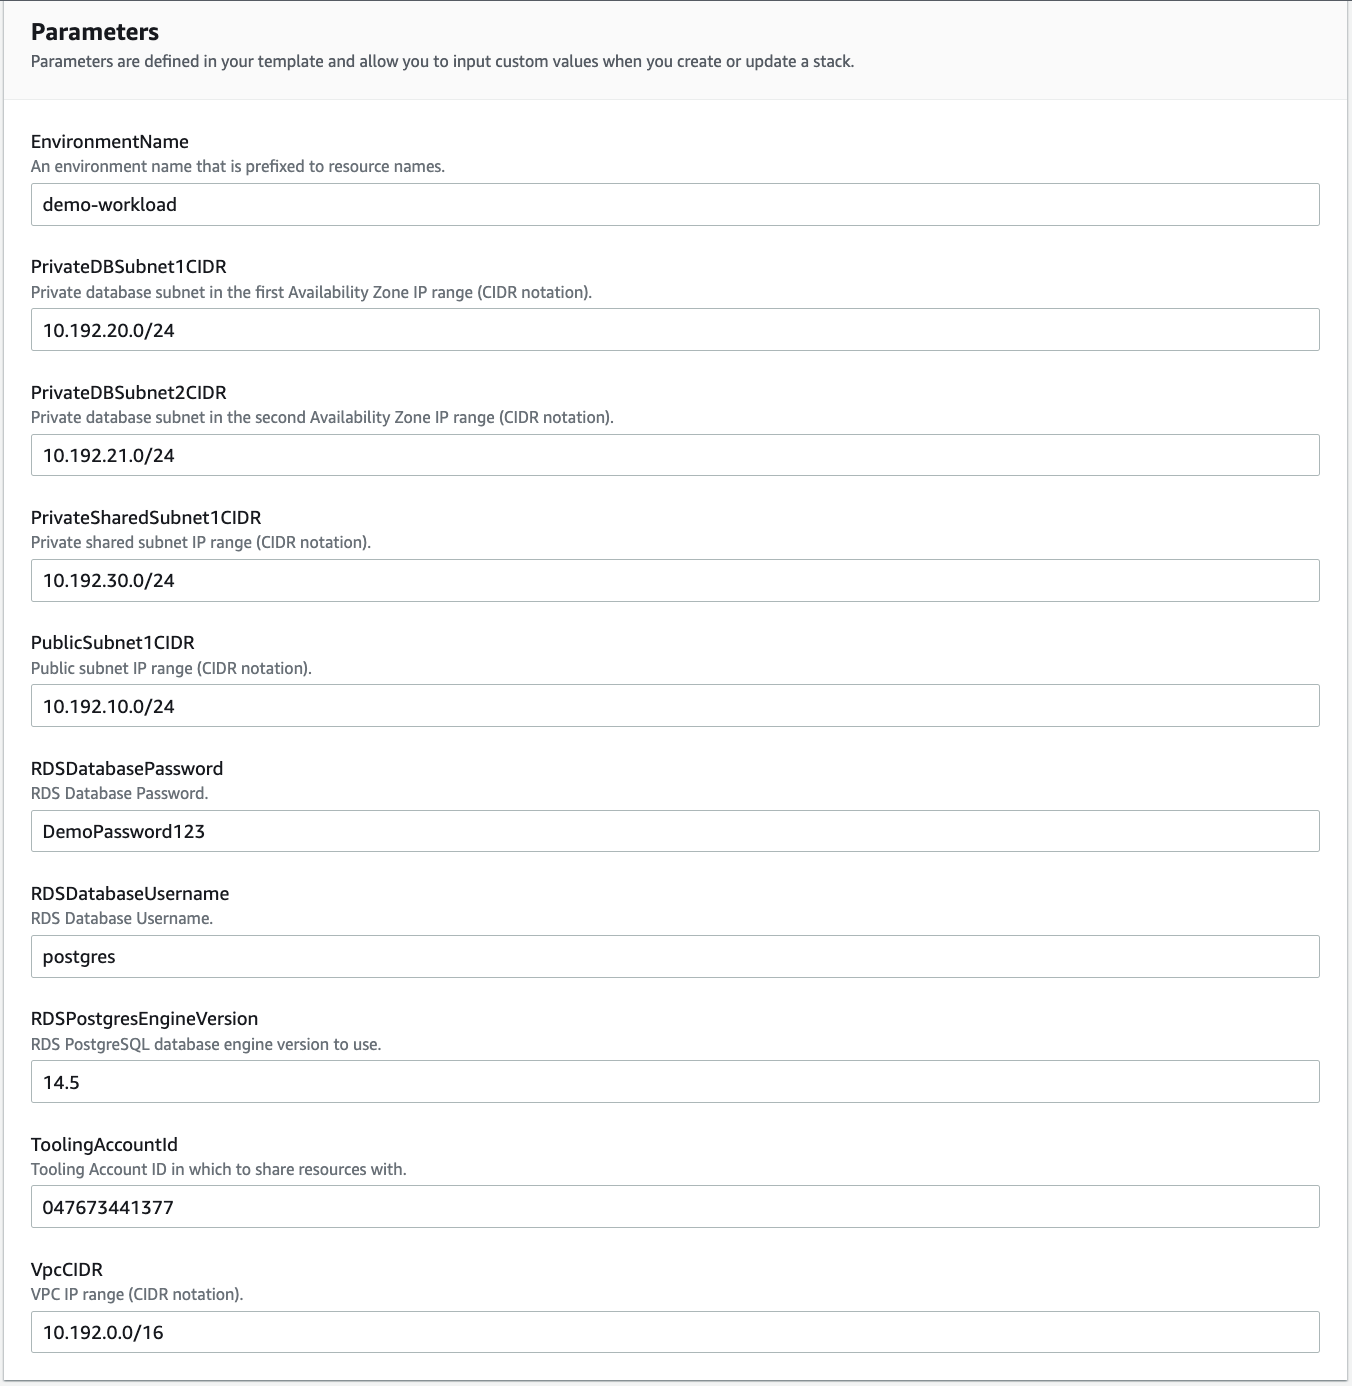
demo-workload.In the Parameters section provide the following parameter values:
EnvironmentName - This can be any environment name you like. In this example we used
demo-workload.RDSDatabasePassword - Provide a password for your database and keep a note of it for later use. This is just for a demonstration database. It is not recommended to provide passwords through CloudFormation parameters for real workloads.
ToolingAccountId - Provide the AWS Account ID that you have identified as your "tooling" account.
Leave all other parameters with their default value then choose Next.
In the Review step Capabilities section, check the required capabilities acknowledgement and choose Submit.
Once the stack has been created, select your stack then select the Outputs. These outputs will be used in later sections of this guide.

Create a CodePipeline GitHub connection in the tooling account
This demonstration uses GitHub as the source code repository for a pipeline using AWS CodePipeline. This repository will hold the CodeBuild build specification as well as the Liquibase change log.
To create the new GitHub repository:
Create a new private repository in your GitHub account. To do this see: GitHub Docs Creating a new repository. In this example, we have created a repository named
liquibase-deploy-demo.From the cloned aws-codepipeline-cross-account-liquibase repo, copy all the files of the codebuild-liquibase-sample/ directory to a new directory for your new GitHub repository. Example:
 # Create directory for new GitHub repo
 mkdir liquibase-deploy-demo

 # Copy sample CodeBuild and Liquibase files to new repo
 cp aws-codepipeline-cross-account-liquibase/codebuild-liquibase-sample/* liquibase-deploy-demo
Initialise your local git repository, commit the new files and push to GitHub. Example:
 cd liquibase-deploy-demo
 git init
 git add .
 git commit -m "Add sample CodeBuild and Liquibase files"
 git branch -M main

 # Replace YOUR_GITHUB_ACCOUNT with your own GitHub account mame
 git remote add origin https://github.com/YOUR_GITHUB_ACCOUNT/liquibase-deploy-demo.git
 git push -u origin main
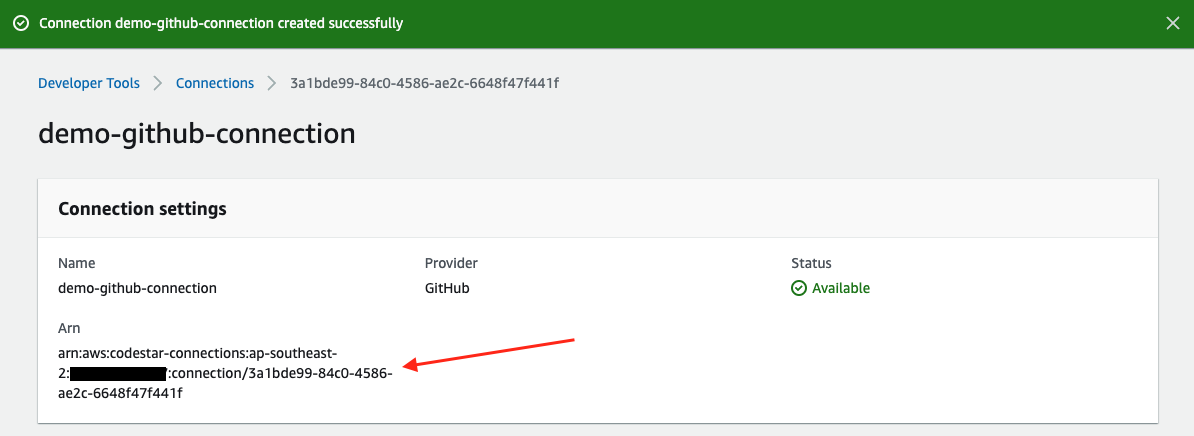
The next step is to create a CodePipeline GitHub connection to your GitHub account. This should be carried out in the tooling account. To do this, see my blog post Create a CodePipeline GitHub connection.
Take note of the newly created GitHub connection ARN for later use.
Deploy CodePipeline and CodeBuild in the tooling account
To deploy the resources using CloudFormation to the tooling account:
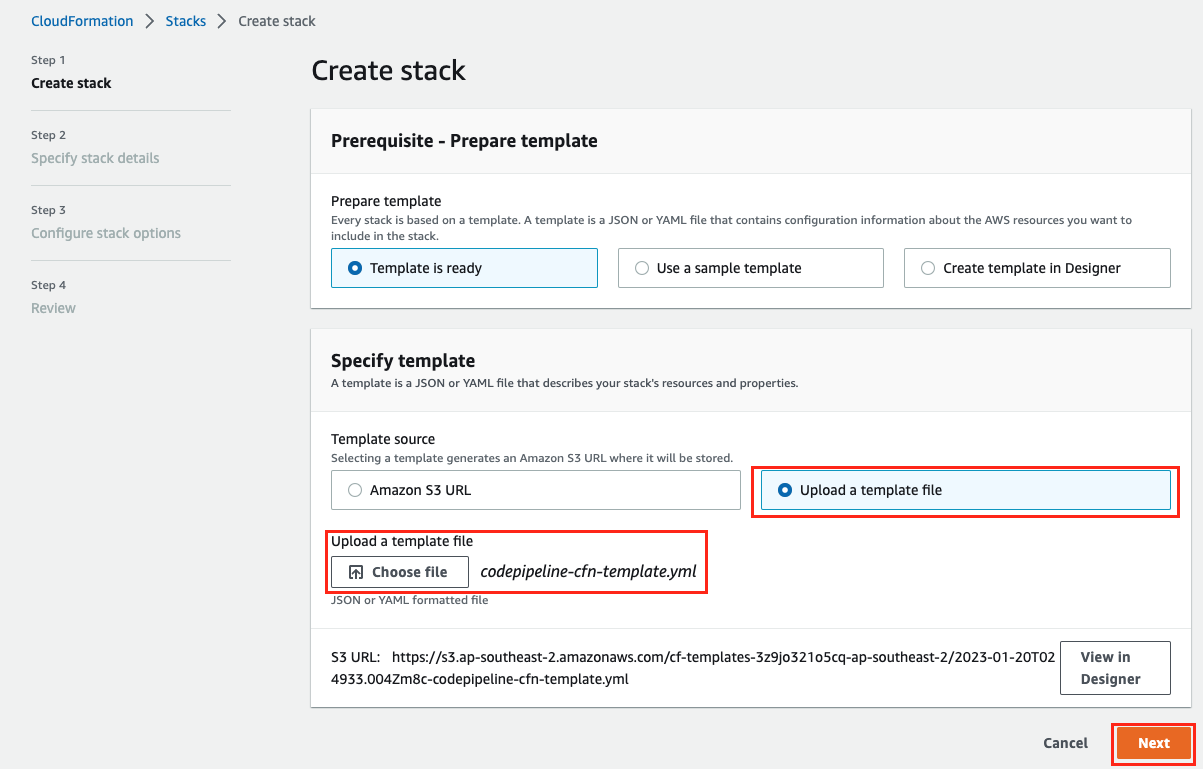
In your tooling account AWS Management Console, navigate to AWS CloudFormation at https://console.aws.amazon.com/cloudformation/
Select Create stack drop-down and choose With new resources (standard).
In the Specify template section, select Upload a template file and select Choose file. From the cloned repository aws-codepipeline-cross-account-liquibase, select the file tooling-account/codepipeline-cfn-template.yml then choose Next.
Enter a stack name such as
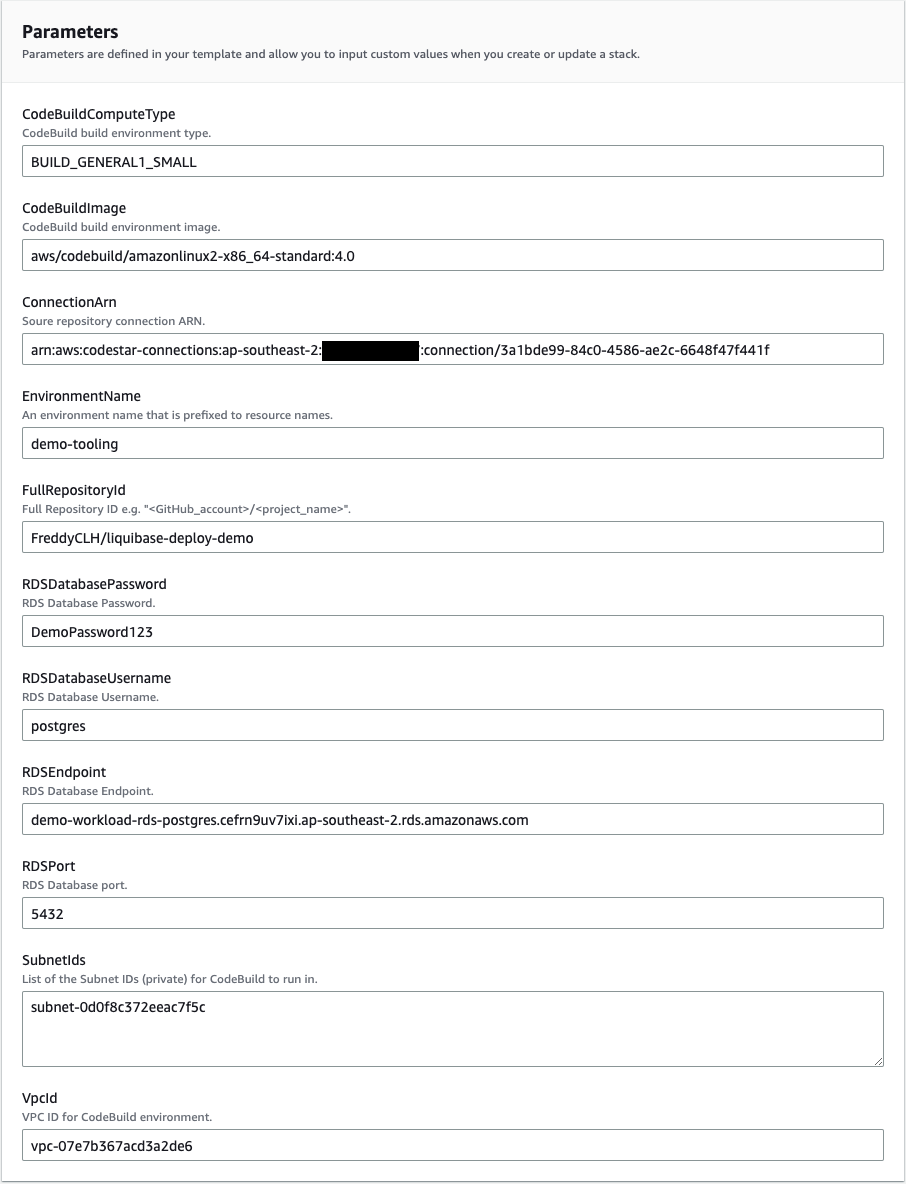
demo-tooling.In the Parameters section provide the following parameter values:
EnvironmentName - This can be any environment name you like. In this example we used
demo-tooling.The following parameters have values that come from the section Deploy the RDS database and shared subnet in the workload account:
RDSDatabasePassword - The password of the RDS database created in the workload account.
RDSEndpoint - The RDS Database endpoint address in the workload account. This is the output
RDSEndpointAddressfrom the CloudFormation stackdemo-workload.SubnetIds - The subnet ID that is shared from the workload account. This is the output
SharedSubnetIdfrom the CloudFormation stackdemo-workload.VPCId - The VPC ID of the shared subnet from the workload account. This is the output
VPCIdfrom the CloudFormation stackdemo-workload.
The following parameters have values that come from the section Create a CodePipeline GitHub connection in the tooling account:
ConnectionArn - The GitHub Connection ARN
FullRepositoryId - Your created GitHub repository ID in the format
<GitHub_account>/<project_name>. For example,FreddyCLH/liquibase-deploy-demo.
Leave all other parameters with their default value then choose Next.
In the Review step Capabilities section, check the required capabilities acknowledgement and choose Submit.
Check the pipeline Liquibase update to RDS database
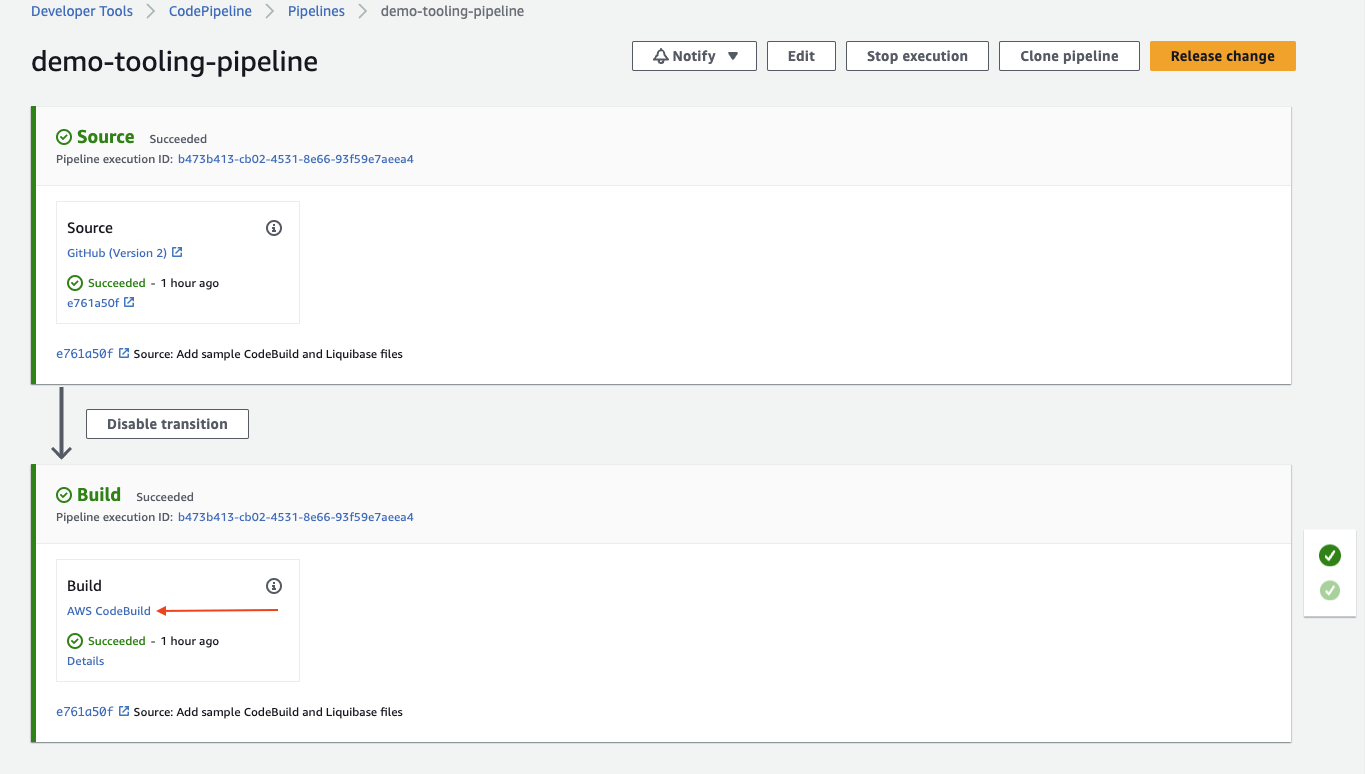
The CodePipeline will run a new release as soon as it is deployed by the CloudFormation stack. To view it in your tooling account AWS Management Console, navigate to AWS CodePipeline at https://console.aws.amazon.com/codepipeline. Locate your Pipeline name (e.g. demo-tooling-pipeline) and choose it.

You should see succeeded Source and Build stages.
In the Build stage, choose AWS CodeBuild to take you to the AWS CodeBuild project.
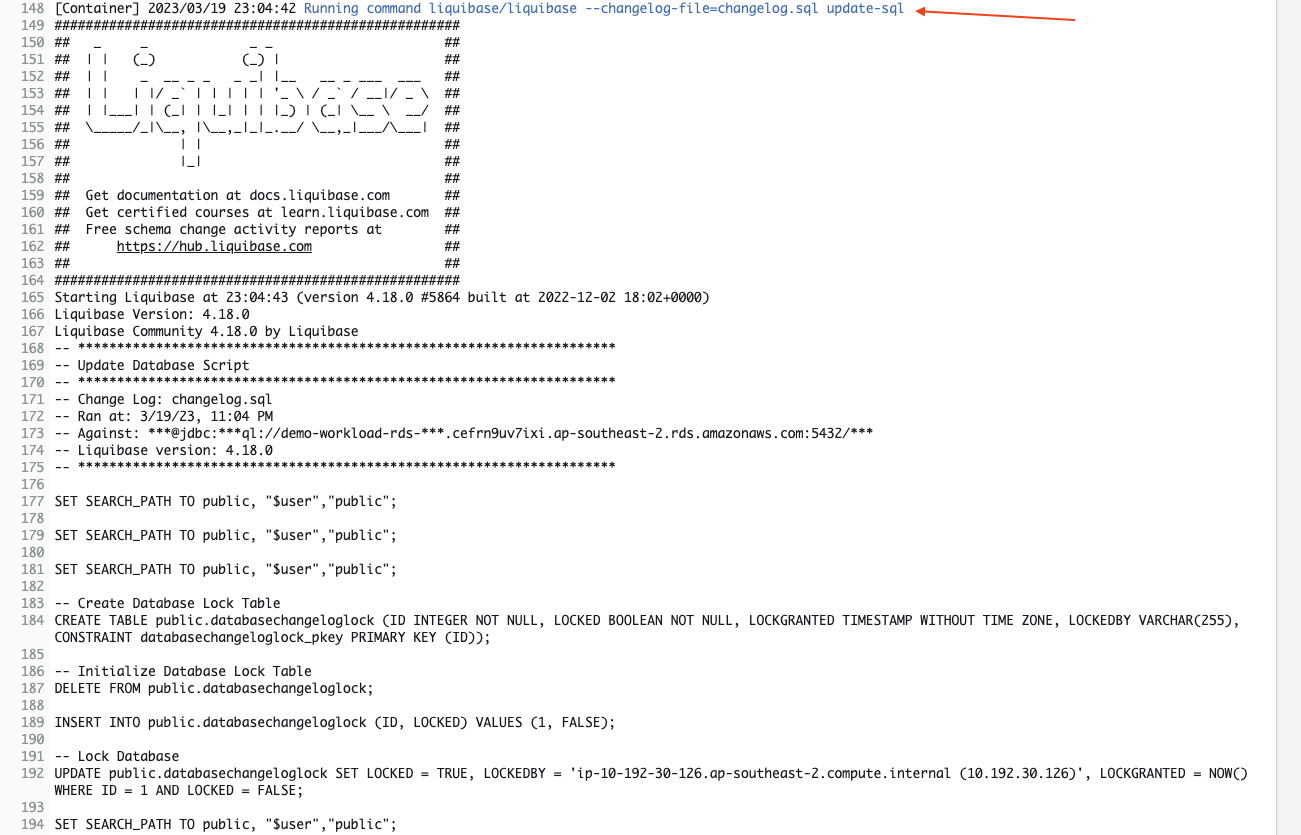
Under Build history, choose the last build run. Under the Build logs, you should see the Liquibase commands executed and their returned outputs.
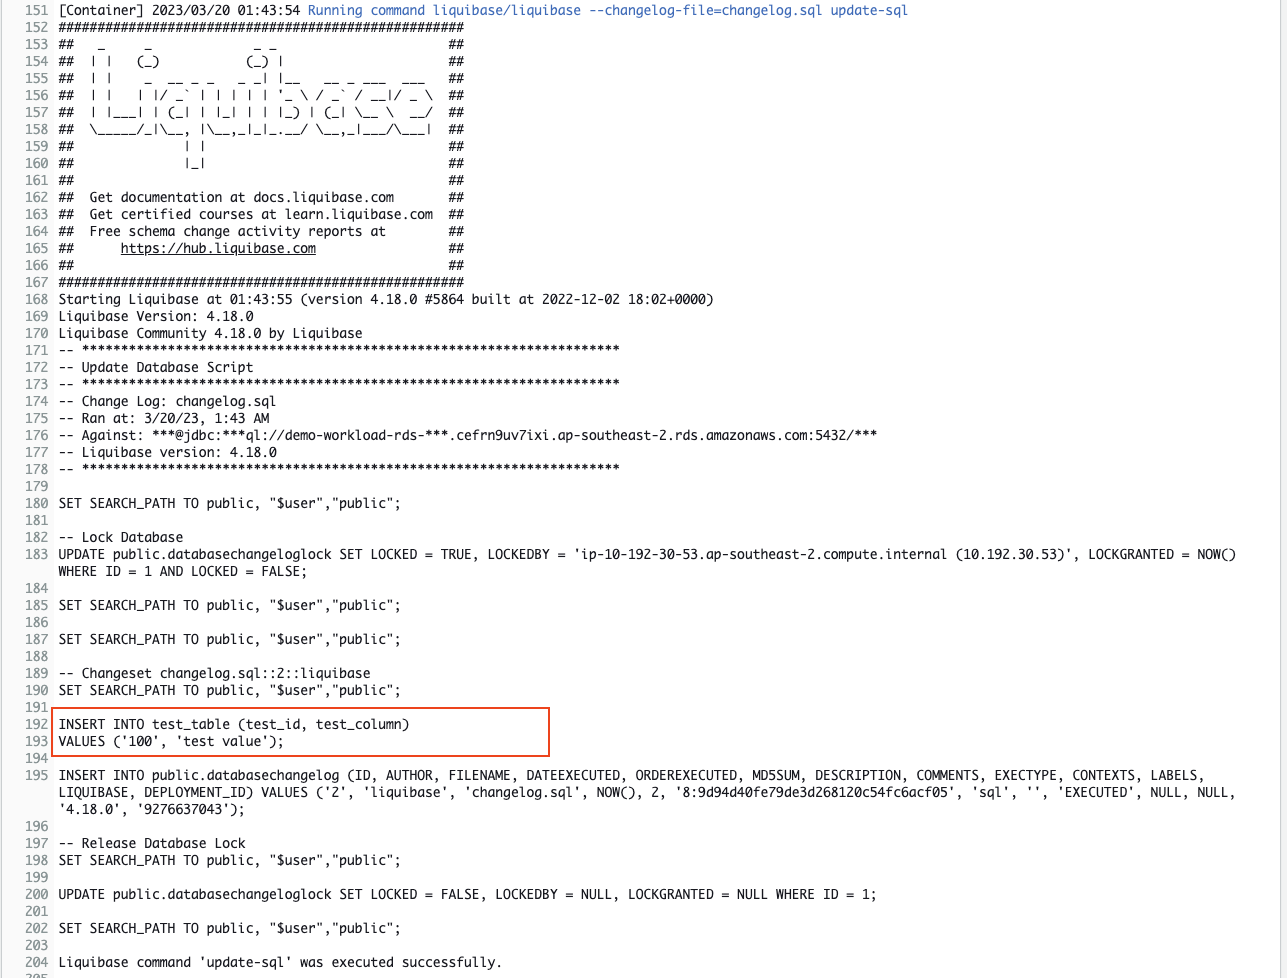
Below is an example screenshot of the output of the command liquibase --changelog-file=changelog.sql update-sql. This command allows you to view the SQL that Liquibase will run to update the database.
The next below screenshot is the output of the command liquibase --changelog-file=changelog.sql update. This command applies the updates to the database.
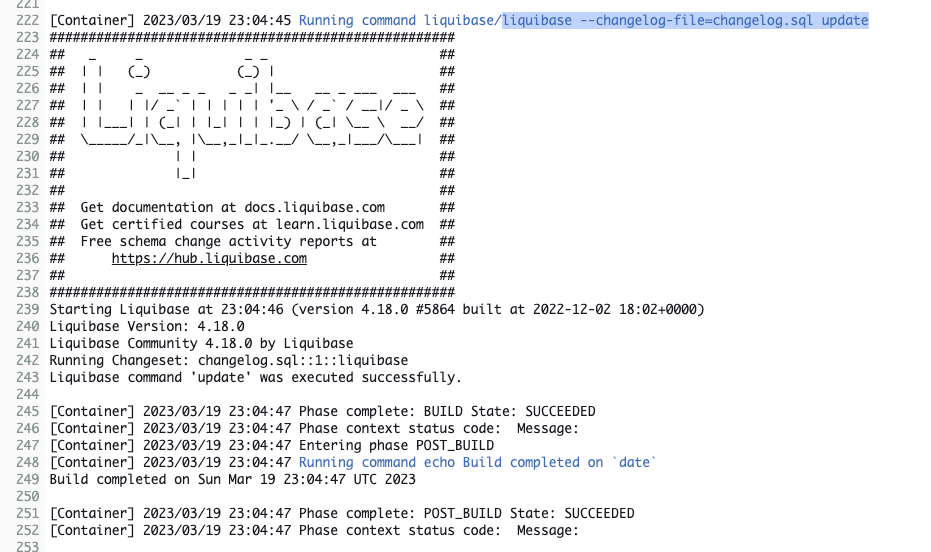
You can view all the commands that are to run in the CodeBuild buildspec.yml file (that you copied from codebuild-liquibase-sample/buildspec.yml).
Connect and check the RDS database using a tester EC2 (optional)
The applied database update consists of the creation of a new table called "test_table". You can view the SQL that is applied by Liquibase in the changelog.sql file (copied from codebuild-liquibase-sample/changelog.sql).
To check if the RDS database has been updated, we need to connect to the database with a SQL client. An EC2 Launch template has been provided in the CloudFormation Stack deployed in the workload account. This launch template will launch an EC2 instance with network connectivity to the RDS database. It is also provided with an IAM role that allows AWS SSM Session Manager connection. You can locate the Launch Template ID in the CloudFormation stack output EC2TesterLaunchTemplateId.
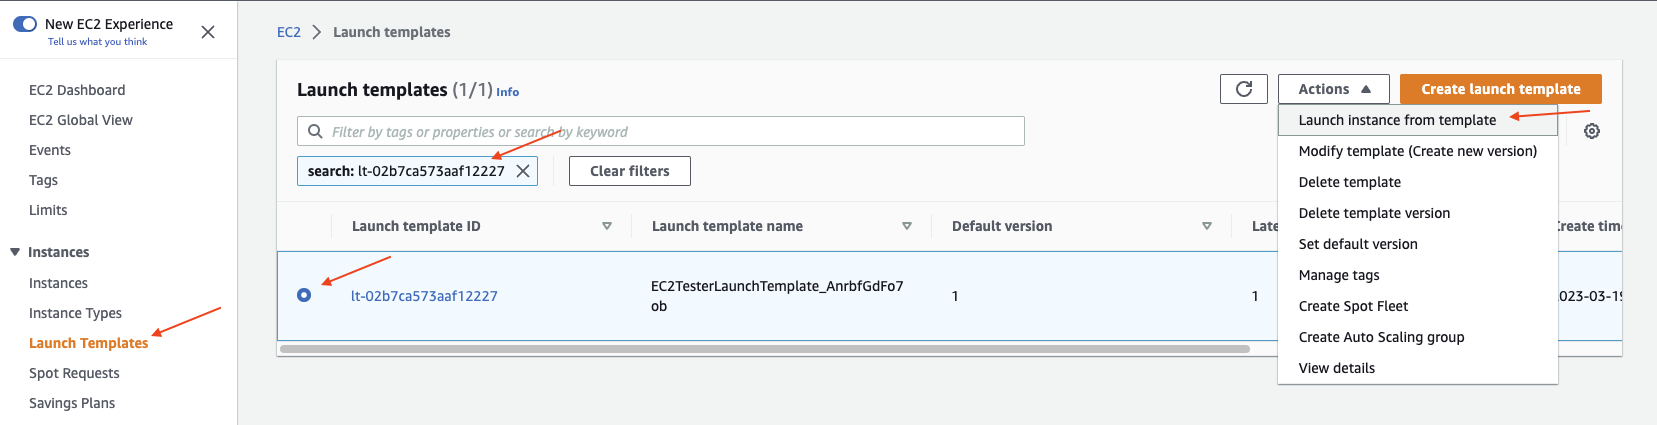
In the workload account AWS Management Console, navigate to EC2 at https://console.aws.amazon.com/ec2. Under Instances choose Launch Templates. In the search bar, enter the Launch Template ID. Select the Launch template then under Actions choose Launch instance from template.
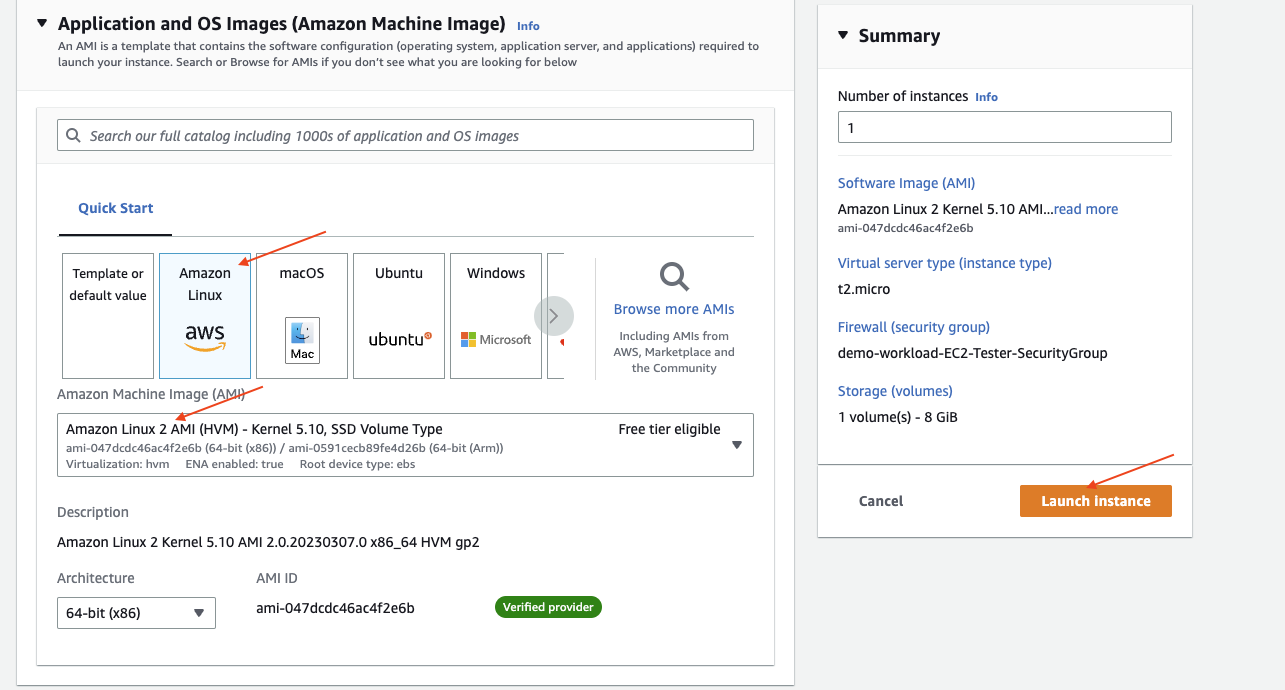
Under Application and OS Images, choose Amazon Linux 2. Under Key pair, choose Proceed without a key pair.
Choose Launch Instance to launch the tester EC2.
The EC2 instance is tagged with the Name
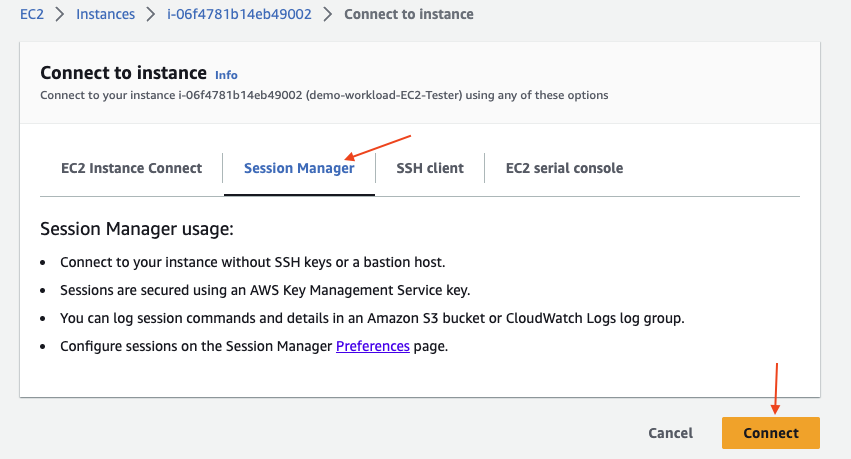
demo-workload-EC2-Tester(or prefixed with your chosen environment name). Give a few minutes for the EC2 instance to start then select it and choose Connect.
Under Session Manager, choose Connect.
Use the following command to install the PostgreSQL client:
$ sudo amazon-linux-extras install postgresql14Use the following command to connect to the RDS database. Replace
<DB instance endpoint>with the value from the CloudFormation stack outputRDSEndpointAddress.$ psql \ > --host=<DB instance endpoint> \ > --username=postgres \ > --password Password: psql (14.3, server 14.5) SSL connection (protocol: TLSv1.2, cipher: ECDHE-RSA-AES256-GCM-SHA384, bits: 256, compression: off) Type "help" for help. postgres=>Check that the "test_table" has been created:
 postgres=> \dt
                  List of relations
  Schema |         Name          | Type  |  Owner
 --------+-----------------------+-------+----------
  public | databasechangelog     | table | postgres
  public | databasechangeloglock | table | postgres
  public | test_table            | table | postgres
Check the change logs in the "databasechangelog" table:
 postgres=> SELECT id, author, filename, dateexecuted, exectype FROM databasechangelog;

  id |  author   |   filename    |        dateexecuted        | exectype
 ----+-----------+---------------+----------------------------+----------
  1  | liquibase | changelog.sql | 2023-03-19 23:04:47.585474 | EXECUTED
Make another RDS database change using the pipeline
Any changes pushed to your code repository on GitHub will trigger a new pipeline release to run. Thus, to make further updates to the RDS database, we simply need to make changes to the changelog.sql file, then commit and push the change to the GitHub repository.
Let's make another change to the database by doing an INSERT to the test_table.
In your created repository (e.g. liquibase-deploy-demo), update the changelog.sql file to the following:
-- liquibase formatted sql

-- changeset liquibase:1
CREATE TABLE test_table (test_id INT, test_column VARCHAR(256), PRIMARY KEY (test_id))

-- changeset liquibase:2
INSERT INTO test_table (test_id, test_column)
VALUES ('100', 'test value');
Commit these changes and push the changes to GitHub:
git add changelog.sql
git commit -m "Update DB with an INSERT"
git push
From the tooling account AWS CodePipeline, you should see a new pipeline release run. Check the latest CodeBuild run history (to do this, refer to Check the pipeline Liquibase update to RDS database)
The Build logs contain the output of the liquibase update-sql command. This output shows that an INSERT to the test_table will be performed.
You can use the EC2 tester (that was set up in Connect and check the RDS database using a tester EC2) to query the test_table and show the inserted row:
postgres=> SELECT * FROM test_table;

 test_id | test_column
---------+-------------
     100 | test value
CodeBuild using shared subnets
The key piece that enables the cross-account deployment is the ability to share VPC subnets with other AWS accounts within the same AWS Organization.
A subnet can be shared with other accounts using AWS Resource Access Manager (RAM). You should be aware of the following points when sharing subnets:
Subnets can only be shared with accounts in the same AWS Organisation
After a subnet is shared, the participants can view, create, modify, and delete their application resources in the subnets shared with them. Participants cannot view, modify, or delete resources that belong to other participants or the VPC owner.
AWS RAM managed permissions are used to define the actions that principals (accounts to share with) are allowed to perform on the shared resources. For more information see: https://docs.aws.amazon.com/ram/latest/userguide/security-ram-permissions.html
To see a list of limitations with VPC sharing see: https://docs.aws.amazon.com/vpc/latest/userguide/vpc-sharing.html#vpc-share-limitations
Once the subnet is shared, the CodeBuild project can be configured to use the shared subnet in its VPC configuration.
A CodeBuild project can be configured to run in subnets of a VPC. The container that CodeBuild launches to run the build can then access resources inside the VPC so long as the appropriate VPC network configuration is set up as well. These are summarised in the following points:
CodeBuild will require a security group to run in a VPC. This security group should allow outbound connectivity to your desired network resources.
The CodeBuild build agent will need an outbound connection to the public AWS CodeBuild service and any other public AWS services it uses such as S3.
This can be achieved by using a NAT Gateway and allowing HTTPS outbound connectivity.
Alternatively, VPC endpoints could be used (see https://docs.aws.amazon.com/codebuild/latest/userguide/use-vpc-endpoints-with-codebuild.html)
CodeBuild will only work in a private subnet. It does not work in a public subnet as it does not attempt to assign a public IP address to its ENI.
The CodeBuild IAM role needs permission to create an ENI in the VPC. The defined IAM permissions can be seen in the CloudFormation IAM role resource named
CodeBuildIamRole, in tooling-account/codepipeline-cfn-template.yml.
Viewing the shared subnet in AWS Resource Access Manager
To view the shared subnets from the workload account in the AWS Management Console, navigate to Resource Access Manager (https://console.aws.amazon.com/ram).
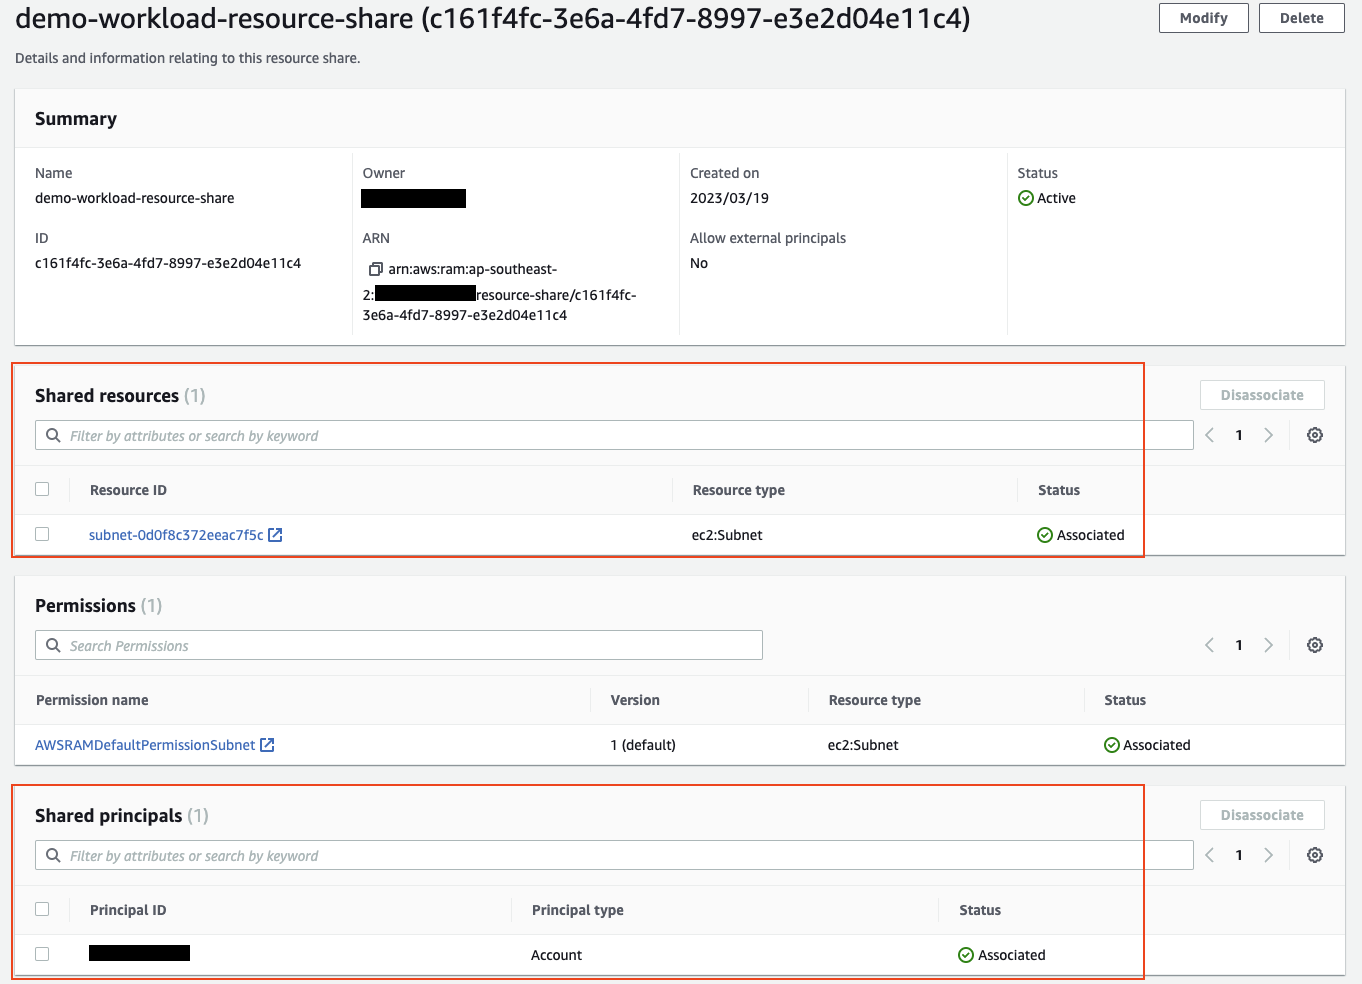
Under Shared by me, choose Resource shares. Choose your resource share name (e.g. demo-workload-resource-share).

Here you can see the subnet ID resource that has been shared as well as the AWS account ID it has been shared with.
You can also view the shared subnet resource from the tooling account in Resource Access Manager, located under Shared with me > Resource shares.
Conclusion
By using AWS CodeBuild configured to use shared subnets, we can perform scripted cross-account deployments to application resources within the shared VPC. In this post, we have demonstrated how this can be done with a cross-account RDS Database update using Liquibase. The RDS database endpoint in the VPC is accessible from the shared subnet used by the CodeBuild agent.
A pipeline was built using AWS CodePipeline that uses a GitHub repository source and runs the CodeBuild task. This will automatically trigger any further database updates by making changes to a Liquibase change log file and pushing it to the source GitHub repository.
By taking advantage of this cross-account deployment capability, we are able to have all our deployment pipeline resources (CodeBuild and CodePipeline) in a single "tooling" AWS account. We are able to deploy to multiple "workload" AWS accounts from this centralized deployment pipeline location.
Clean up
Clean up resources in the tooling account
From the tooling account AWS Management Console, navigate to AWS CloudFormation at https://console.aws.amazon.com/cloudformation/. Under Resources, find and make not of the S3 bucket name that belongs to the Resource Logical ID ArtifactsBucket.
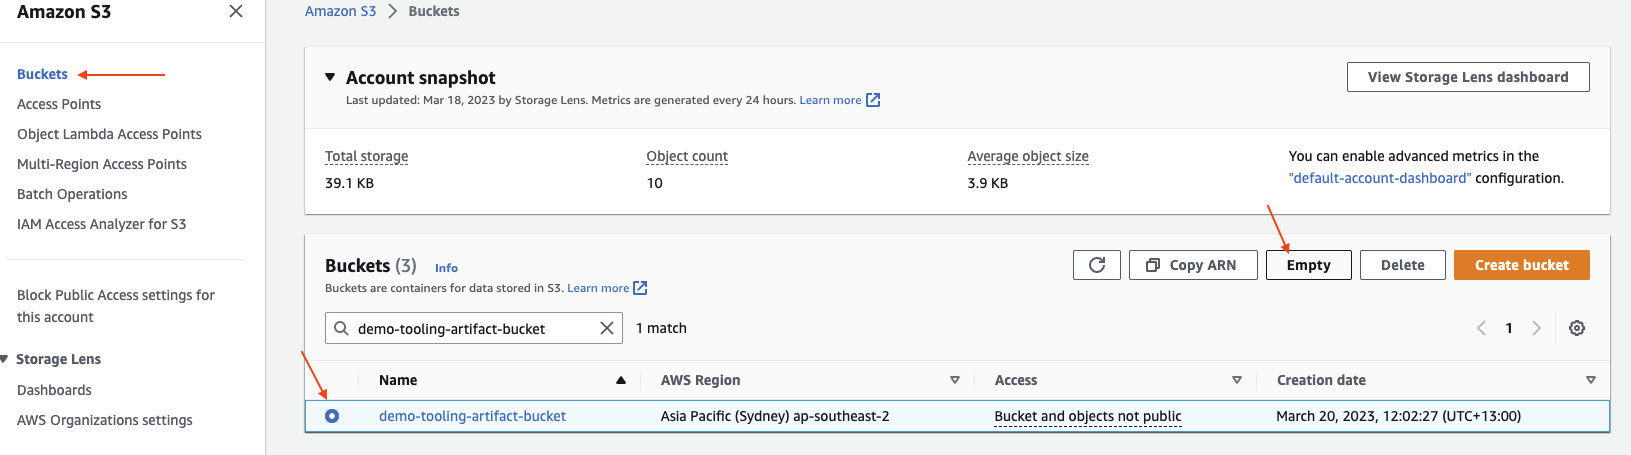
Navigate to S3 at https://console.aws.amazon.com/s3. Under Buckets, search and select your bucket name then choose Empty.
Go back to CloudFormation at https://console.aws.amazon.com/cloudformation/. Under Stacks, select your CloudFormation stack (e.g. demo-tooling), then choose Delete.

Clean up resources in the workload account
From the workload account AWS Management Console, navigate to EC2 at https://console.aws.amazon.com/ec2/.
Terminate any tester EC2 instances (e.g. Name tag demo-workload-EC2-Tester) by selecting it then under Instance state choose Terminate instance.

Navigate AWS CloudFormation at https://console.aws.amazon.com/cloudformation/. Under Stacks, select your CloudFormation stack (e.g. demo-workload), then choose Delete.


